Show Layer Window
Using the Layers submenu, you can display or deactivate the Layers window. The Layers window is first hidden after Arbortext IsoDraw is started. You can open the Layers window by selecting the Show layer window command. Selecting this command again or clicking in the Close button of the window closes the Layers window.
The Layers window shows the layers of the current file. Clicking the arrow at the top right opens a pop-up menu showing the commands of the Layers menu. The window can be moved anywhere within the working area and changed in size.
You can picture the individual layers of an illustration as overhead transparencies laid on top of each other, each layer can be handled separately. Each element of your illustration belongs to a layer. Since the layers can have different attributes, e.g. visibility, you can control groups of elements by means of layers.
| It is quite possible to create simpler illustrations on just one layer. For complex drawings it is advisable to simplify editing the elements by splitting them up over several layers. Working with layers in this way makes it possible, for example, to create auxiliary constructions or notes on separate layers, which can then be either removed or deactivated when the illustration is printed out or exported. |
The Layers window helps you organize the work with layers.
Layers of the Illustration
Arbortext IsoDraw automatically creates the Standard layer and Background layers in a new file. It is not possible to delete or rename these layers. In addition, you can create as many further layers as you want.
Active Layer
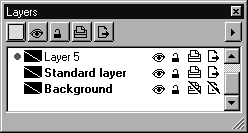
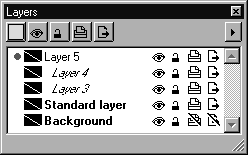
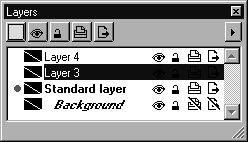
The standard layer is marked initially with a red dot in front of the name, identifying it as the active layer. The active layer is assigned all the elements which you create. You select another layer as the active layer by clicking the empty field in front of the name of the layer you want to activate.
Identifying Empty Layers
The Layers window also allows you to see whether a layer is empty, i.e. whether it contains elements or not. If it is empty, the name is shown italicized and inset as with Layer 3 and Layer 4.
| You can use the Delete layer command while holding down the SHIFT key to delete all empty layers in one stroke. |
Naming
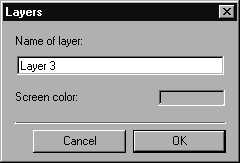
You can also change the names of the layers you have created. Double clicking the name of a layer opens a dialog box in which you can enter the new name. This window also lets you set a screen color for the layer.
| No two layers within a file are allowed to have the same name. The names Standard layer and Background cannot be changed. |
Clicking the color box opens the Colors dialog box. Select a color from this window. Confirm your selection in the Layers dialog box with OK. You can control the use of the color with the layer settings.
Layer Attributes
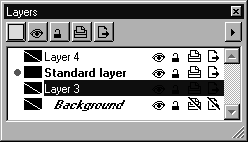
Each layer has five different attributes which you can activate or deactivate separately. This is done by clicking one of the symbols on the right of the layer's name.
If you want to change the attributes of all layers at the same time, click one of the symbol keys in the symbol bar at the top. The Background layer and the attributes visible and locked for the standard layer will not be changed, however.
As mentioned in the last section, you can assign an identifying color


to a given layer. This color is used to identify the elements belonging to the layer in question. This is done by drawing all the elements on the layer in this screen color when the color is active.
If the color is not active, the elements will be drawn in the colors defined by pens and fills.
| The identifying color does not affect the printout. The printout is always based on the colors defined for pens and/or fills. |
A layer can be visible or not

. If it is visible, its elements are displayed on the screen.
| Even if the layer is visible, locked elements which have been concealed with the Hide command (in the Element menu) are not displayed. |
A layer can be locked or unlocked

. If it is locked, you cannot select the elements of this layer.
| Elements which have been locked with the Lock command (in the Element menu) are not affected by this setting. |
A layer can be printable or not

. If it is printable, its elements will be printed out. This variant is useful e.g. for auxiliary constructions or notes.
A layer can be exportable or not

. If it is exportable, its elements will be exported. This variant, too, is useful for elements which you need in the
Arbortext IsoDraw illustration but not for further editing in the DTP program.
| The active layer is always visible and not locked. The relevant symbols are not accessible. When you create a new file, the background layer is identified as being not printable and not exportable. This presetting is designed to prevent image elements which are used as templates from being either printed or exported. |
Sequence of Layers
The sequence of the layers on an illustration plays an important role. Layers which are at the front hide parts of layers located at the back.
You can change the sequence of layers in the Layers window. First select the elements you want to change. Then drag it with the mouse to the point in the list where you want to paste it. As soon as you release the mouse button, the layer will be pasted into its new position.
| The background layer is always at the bottom. It cannot be moved. |
Background Display
It is possible to use preference values to control the display of image elements on the background layer, e.g. if a photo is to be used for tracing. Double clicking the name of the background layer opens the relevant dialog box.
| A detailed description of the dialog can be found in Preferences. |
Selecting Layers
When you select elements, the corresponding layer is also selected in the Layers window. If you have selected several elements on various different layers, no layer will be selected.
| The commands in the pop-up menu for editing layers almost always affect the selected layer. Before you execute one of these commands, you should check whether the required layer has been selected. |
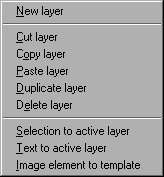
You can use the commands from this pop-up menu to edit the layers in different ways.
If you open a new window in Arbortext IsoDraw, the Standard layer and Background layers are created automatically. These layers are protected and cannot be deleted. Should you wish to create additional layers, you can do this with the New layer command from the submenu. A new layer is created and will appear in the layer window. The new layer is assigned the name Layer and a consecutive number, e.g. Layer 3. This layer automatically becomes the active layer, i.e. all elements which you now generate will be assigned to this layer.
You can create as many layers as you want.
You can use the commands Cut layer, Copy layer, Paste layer, and Duplicate layer to edit the layer selected in the Layers window together with all the elements assigned to this layer.
The Cut layer command, for example, allows you to remove the layer and all the elements on this layer from the illustration. If you now paste this layer into another illustration using the Paste layer command, the elements included on this layer will also be pasted to the new illustration.
You can copy a layer to another file using drag and drop. To do this, click on the name of the layer and drag it to another file window. Now release the mouse button. The layer will now be copied to the target file.
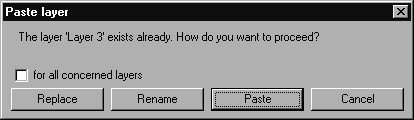
When copying layers, you may find that there is already a layer with the same name in the target file. If this happens with one of the standard layers, the content of the layer to be copied will be pasted into the existing layer. Otherwise, the following dialog box appears:
Here, you can select how the layer is to be used. Clicking Replace causes the existing layers to be replaced with the pasted ones. Clicking Rename causes the pasted layers to be renamed. Paste causes the elements of the layers to be added to the existing layers. Clicking Cancel terminates the procedure without any changes being made. Use the for all concerned layers box to specify whether your selection is to apply to all layers that you are in the process of copying. This only applies for situations where several layers are being pasted at the same time, for example when loading layers from a file. The Delete layer command lets you delete a layer together with all its elements.
Drawings imported from CAD systems in particular often show a great number of layers. Many of them are empty and can be deleted in order to give the drawing greater clarity.
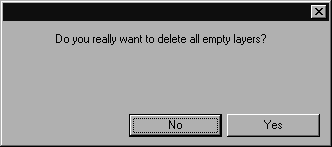
You can do this by holding down the SHIFT key and selecting the Delete layer command. The following dialog box appears:
Clicking Yes deletes all empty layers in the active file. Clicking No aborts the procedure. The command Selection to active layer assigns all selected elements to the active layer. The command Text to active layer allows you to assign all text elements in the active file to the active layer. If you want to manage all texts on one layer in order to be able to hide them or edit them separately, for example, you should first create a new layer. This new layer automatically becomes the active layer and you now only need to select the Text to active layer command.
| This does not include text elements which have been locked, assigned to a locked layer or masked in another element. |
The Image element to template command assigns selected image elements, i.e. pixel data, to the Background layer. The image elements are displayed in the screen color selected for displaying the background.