Element Info
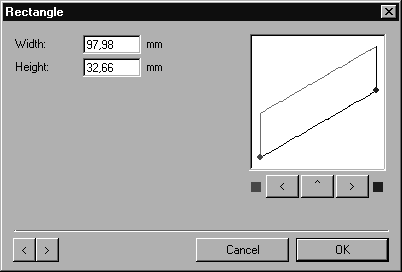
The Element info dialog box enables you to change the width and height of any particular rectangle. Select a rectangle and choose > .
| The > command can only be executed for a single element. |
You can perform changes by making entries in both fields. These changes will be displayed roughly in the preview box at the upper right.
The current side is already selected in the display field and you can switch to the next or last segment by clicking the next segment and last segment

buttons respectively. The changes you make are always applied to the selected side.
Width and Height
In a flat view there are exact rules governing how the width and height are to be measured. In perspective representations, however, such a clear-cut assignment is not possible. Consequently, when the Element info dialog box is called up, the side whose length is referred to as the width is always selected. The height is measured on one of the sides abutting this initial segment.
The values displayed correspond to the lengths which you can verify in the printout.
| The dimensions displayed while you are drawing correspond to the unforeshortened values along the major axes. |
Width
You can enter the width of the rectangle in this field. You then specify which points are to be affected by the change.
Clicking the button next to the blue square or red square


moves the point shown in the same color on the line (rectangle line). Clicking the middle

button moves both end points by the same amounts.
The points of the rectangle lying opposite each other are also moved accordingly.
Height
You can enter the height of the rectangle in this field. You then specify which points are to be affected by the change.
Clicking the button next to the blue square or red square
moves the point shown in the same color on the line (rectangle line). Clicking the middle
button moves both end points by the same amounts.
The points of the rectangle lying opposite each other are also moved accordingly.
Quitting the Dialog Box
You can confirm your entries by clicking OK. Clicking the Cancel button quits the dialog box without applying any changes you have made.