Steps for Completing the Shaft Drawing
1. Move a copy of square (1) using the dialog box with the settings: Connecting lines, Distance20 mm, Angle150°.
Move a copy of ellipse (2) using the dialog box with the settings: Connecting lines, Distance45 mm, Angle330°.
Use the element info dialog box to convert the ellipse (3) thus created into an outer thread and enter -16 for the (thread) Depth.
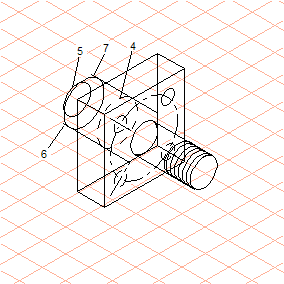
2. Move a copy of ellipse (4) using the dialog box with the settings: Distance20 mm, Angle150°.
Move a copy of ellipse (4) using the dialog box with the settings: Connecting lines, Distance30 mm, Angle150°.
Move a copy of the ellipse (5) thus created using the dialog box with the settings: Distance5 mm, Angle330°.
Change the diameter of ellipse (5) in the dimensions bar from 30 mm to 20 mm.
3. Click on the projecting end of line (6) and press the F6 key
| F6 is the command code for > > menu. |
Delete the projecting end of line (7) in the same way.
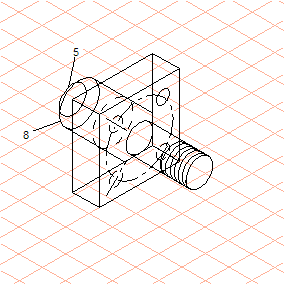
4. The connecting lines between the outer edges of ellipses (5) and (8) are still to be drawn.
To do this, select the
Tangent to an ellipse
tool from the toolbox
The cursor now has a small circle underneath the arrow

.
5. Click on the outside of ellipse (8) and drag the tangent out towards ellipse (5).
Use the same method to draw a tangent between the outer edges on the other side of both ellipses.
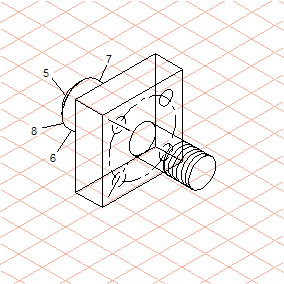
6. Press F5 to delete each of the hidden parts of ellipses (5) and (8).
| F5 is the command code > > menu. |
Press F5 to delete the hidden parts of lines (6) and (7) as well. Also delete ellipse (4).
Where necessary, also change the pen type (thick/thin) for inner and outer edges on the elements that have been changed.
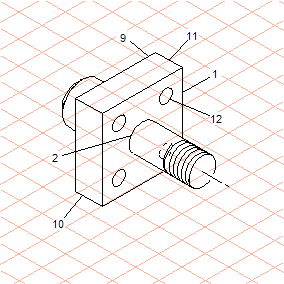
7. Press F5 to delete the hidden lines of squares (1) and (9) and the hidden part of ellipse (2).
Delete the center circle and the center lines of the bores (12).
Using the thick/thin technique, change the pen type for the three visible bores.
| To select individual ellipse parts, hold the ALT key down. |
Select the thin pen with a dash style for the hidden bore.
Check that the pen assignment for all other elements (e.g. lines (10) and (11)) is in line with the thick/thin technique. If necessary, double click on an element to change it.
Draw another center line on the thread ellipse
This completes the drawing of the shaft.