3D Transparency Tools
The 3D transparency tools can be used to make freely selectable areas of selected objects or surfaces transparent. They can be used to make areas (objects or surfaces) that lie behind other areas visible too. For example, you can use this tool to represent covered parts or parts that are functionally important.
Two transparency tools are available;
3D transparent rectangle
and
3D transparent free shape
.
Select the object(s)/surface(s) to be made transparent. Once you have activated a 3D transparency tool, you can switch to the arrow

cursor temporarily by pressing the CTRL key.
If you do not hit any selected objects, all objects/surfaces will be selected. The whole area of the drawing that has been selected with one of the transparency tools will then be made transparent. In principle, this produces a wire frame of the selected area of the drawing.
3D Transparency (with Selection Rectangle) Tool
When you use the
3D transparent rectangle tool, you drag a rectangle. All selected areas of objects or surfaces inside the selection rectangle are made transparent. The resulting transparent section is rectangular. As soon as you release the mouse button after dragging the selection rectangle, all elements that lie behind the selected objects or surfaces within this area become visible.
3D Transparency (with Lasso) Tool
If you select the
3D transparent free shape tool instead, the cursor becomes a lasso. In principle, the lasso functions exactly like the selection rectangle. With the lasso however, you can freely define the boundary within which the objects or surfaces are to be made transparent. The lasso is particularly useful when a broken-out section is to be shown. As soon as you release the mouse button, all elements that lie behind the selected objects or surfaces within the broken-out area become visible.
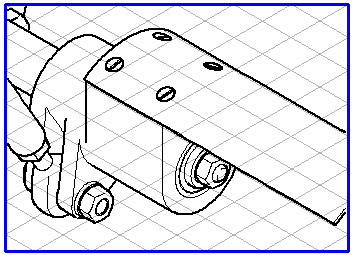
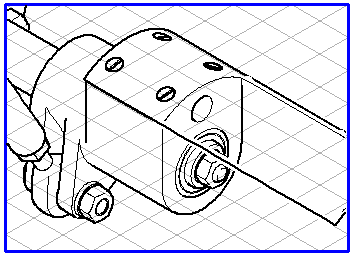
In the following example, you can see an excerpt from a drawing where the 3D transparent free shape has not been used (left) and one where it has been used (right) after projection into a 2D illustration. As you can see in the figure on the right, the contour lines of the transparent elements are always shaded.
If you want to cancel the result after the transparency has been performed, select > .
The objects or areas are then shown in their original form again.