範例:將 PingFederate 作為識別提供者,將 Windchill DS 作為資料存放區
此範例提供有關如何配置已針對單一登入配置 ThingWorx,且將 PingFederate 作為「中央授權伺服器」(CAS) 與「識別提供者」(IdP),並將 Windchill DS 作為「資料存放區」之 SSO 環境的詳細步驟。
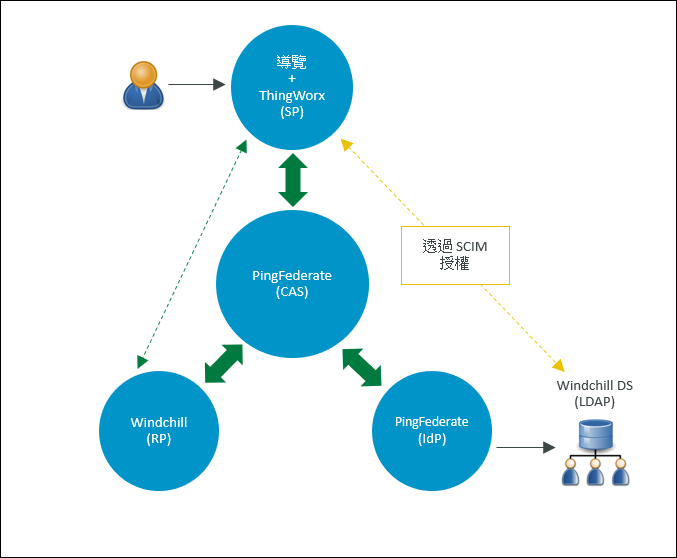
下表顯示了在此範例中配置的應用程式及其角色:
|
角色
|
應用程式
|
||
|---|---|---|---|
|
服務提供者
|
ThingWorx
|
||
|
授權伺服器
|
PingFederate
|
||
|
識別提供者
|
PingFederate (由 Windchill DS 支援)
|
PTC 為本範例討論的 PingFederate 組態提供了自動化指令集。如需詳細資訊,請參閱自動將 PingFederate 配置為中央授權伺服器
下圖顯示了本範例討論的組態。
A 部份:先決條件
• 下載自動化指令集,並將其解壓縮至您電腦的資料夾中。
• 請確保您是初次安裝 ThingWorx。
安裝之後停止 ThingWorx 伺服器。
• 請確保您已設定 Windchill DS。
安裝適用於 PingFederate 版本的適當 Java 版本。在 PingFederate 電腦中,設定 JAVA_HOME 環境變數並更新 PATH 變數,以將 Java 相應包括在內。 |
B 部份:執行指令集之前
步驟 1:建立 PingFederate 全域 SSL 憑證並將其匯出
1. 以管理員身分登入 PingFederate,並導覽至 > 。
2. 按一下 Create New 以建立全域 SSL 憑證,並執行下列操作:
1. 在 Common Name 欄位中,提供 PingFederate 電腦的 FQDN。
2. 提供頁面的其他詳細資訊,然後按一下 Next。
3. 按一下 Done,然後按一下 Save。
4. 按一下 SSL Server Certificates。
5. 針對您建立的 SSL 憑證,在 Select Action 清單中選取 Activate Default for Runtime Server,然後選取 Activate Default for Admin Console。按一下 Save。
此 SSL 憑證即會針對管理主控台與執行時間伺服器標記為 default。
3. 針對 localhost 憑證,執行下列操作:
1. 在 Select Action 清單中,選取 Deactivate for Runtime Server,然後選取 Deactivate for Admin Console。
2. 刪除 localhost 憑證,然後按一下 Save。
4. 欲匯出 PingFederate 全域 SSL 憑證,請執行下列操作:
a. 針對您建立的憑證,按一下 Export。
b. 選取 Certificate Only,然後按一下 Next。
c. 按一下「匯出」。
即會將憑證匯出至預設的 Downloads 資料夾。
d. 按一下 Done,然後按一下 Save。
如需詳細資訊,請參閱針對 PingFederate 配置 SSL 憑證。
步驟 2:將憑證檔案儲存至 PingFederate 自動化組態 input 資料夾
需要使用憑證作為自動化組態流程的輸入。您必須將下列憑證檔案儲存至自動化組態工具的 input 資料夾。input 資料夾位於 sso-config-pingfed-X.Y/input,其中的 X.Y 是指 PingFederate 版本。
◦ 複製您匯出至 Downloads 資料夾的 PingFederate 全域憑證 (.crt) 檔案。
◦ 欲建立 thingworx.cer 檔案並將其複製到 input 資料夾,請執行下列操作:
a. 在 <ThingWorx 安裝資料夾>/ThingworxPlatform 資料夾中,建立 ssoSecurityConfig 資料夾。
b. 建立 JKS 類型的 KeyStore,將其命名為 sso-keystore.jks,並將其儲存在 ssoSecurityConfig 資料夾中,方式如下:
▪ 產生金鑰組。
▪ 將憑證的一般名稱指定為 ThingWorx。
c. 將憑證鏈結匯出至 ssoSecurityConfig 資料夾。
您的 ssoSecurityConfig 資料夾中應該包含下列檔案:
▪ sso-keystore.jks
▪ thingworx.cer
d. 將 thingworx.cer 檔案複製到 sso-config-pingfed-X.Y/input 資料夾。
您的 input 資料夾中必須有下列檔案:
▪ <Exported_SSL_Certificate-From_PingFederate>.crt
▪ thingworx.cer
步驟 3:更新 user.properties 檔案
根據您的組態設定來設定使用者內容。
步驟 4:更新 default.properties 檔案
根據您的組態設定更新預設內容。
C 部份:執行自動化指令集
D 部份:使用產生的加工品
步驟 1:將加工品複製到 ssoSecurityConfig 資料夾
1. 將下列檔案從 PingFederate 自動組態的 output 資料夾 (位於 sso-config-pingfed-X.Y 下) 複製到 /ThingworxPlatform/ssoSecurityConfig 資料夾:
▪ pingfed_idp_metadata.xml
▪ pingfed_signing_certificate.crt
▪ pingfed_ssl_server_certificate.crt
2. 將 pingfed_idp_metadata.xml 重新命名為 sso-idp-metadata.xml。
如需詳細資訊,請參閱使用產生的加工品
步驟 2:將應用程式層簽署憑證匯入至 ThingWorx KeyStore
將 pingfed_signing_certificate.crt 檔案匯入至 /ThingworxPlatform/ssoSecurityConfig 資料夾中的 sso-keystore.jks 檔案。如需詳細資訊,請參閱使用產生的加工品中的 pingfed_signing_certificate.crt 部份。
步驟 3:匯入傳輸層憑證
ThingWorx SSL 憑證
1. 將 ThingWorx SSL 憑證匯入至 PingFederate 電腦的 Java cacerts 檔案。
2. 重新啟動 PingFederate。
PingFederate SSL 憑證
將 pingfed_ssl_server_certificate.crt (PingFederate SSL 憑證檔案) 匯入至 ThingWorx 電腦的 Java cacerts 檔案。
如需詳細資訊,請參閱使用產生的加工品中的 pingfed_ssl_server_certificate.crt 部份。
E 部份 (選用):配置群組對應
請確保您已在 Windchill DS 中定義靜態群組,然後再繼續。 |
在 PingFederate 中執行下列步驟:
1. 轉至 > ,然後選取您的 Instance Name。
2. 在開啟的頁面中,選取 Extended Contract 標籤。
3. 在 Extend the Contract 欄位中,新增 isMemberOf 並按一下 Add。
4. 按一下 Next 以查看 Summary 頁。
5. 在開啟的 Summary 頁,檢閱您的變更,然後按一下 Save。
6. 轉至 > ,並選取您的 Instance Name。
7. 在開啟的頁面中,選取 Extended Contract 標籤。
8. 在 Extend the Contract 欄位中,新增 isMemberOf 並按一下 Add。
9. 按一下 Next 以查看 Adapter Attributes 頁。您不需要在此頁面上執行任何更新。
10. 按一下 Next 以移至 Adapter Contract Mapping 頁,並選取 Configure Adapter Contract。
11. 在 Attribute Sources & User Lookup 頁,按一下 Add Attribute Source。
a. 在 Data Store 頁,執行下列步驟:
i. 針對 ATTRIBUTE SOURCE ID,新增 isMemberOf。
ii. 針對 ATTRIBUTE SOURCE DESCRIPTION,新增 isMemberOf。
iii. 針對 ACTIVE DATA STORE,選取您的 Windchill 資料存放區。
iv. 針對 DATA STORE, 會預先填入 LDAP。
v. 按一下 Next。
b. 在 LDAP Directory Search 頁,執行下列步驟:
i. 針對 BASE DN,新增 o=ptc。
ii. 針對 SEARCH SCOPE, 會預先填入 Subtree。
iii. 針對 Attributes to return from search,選取下列內容:
i. 針對 ROOT OBJECT CLASS,選取 <Show All Attributes>。
ii. 針對 ATTRIBUTE,選取 isMemberOf 並按一下 Add Attribute。
iii. 按一下 Next。
c. 在 LDAP Filter 頁,執行下列步驟:
i. 針對 Filter,新增 isMemberOf=${isMemberOf}。
ii. 按一下 Next。
d. 在開啟的 Summary 頁,檢閱您的變更,然後按一下 Save。
12. 開啟 > 並選取您的 Connection Name。
13. 在開啟的頁面中,選取 Attribute Contract 以開啟 Attribute Contract 頁,然後執行下列步驟:
a. 針對 Extend the Contract,新增 group。
b. 針對 Attribute Name Format,選取具有 unspecified 的選項。
c. 按一下「新增」。
d. 按一下 Next。
14. 在開啟的 Authentication Source Mapping頁,選取您的 Adapter Instance Name。
15. 在開啟的 Attribute Contract Fulfilment 頁,針對您在步驟 12 中建立的 group 屬性契約執行下列步驟。
a. 針對 Source,選取 Adapter。
b. 針對 Value,選取 isMemberOf。
c. 按一下 Save。
請記下對應名稱 (在此範例中為 group),因為您將需要在 ThingWorx SSO 驗證器中使用此名稱。如需詳細資訊,請參閱「ThingWorx 說明中心」的單一登入驗證主題。 |
F 部份:配置 ThingWorx 進行單一登入
1. 請確定 ThingWorx 伺服器已停止。
2. 欲配置 ThingWorx 進行單一登入,請執行下列操作:
2. 您的 ssoSecurityConfig 必須包含下列檔案:

3. 啟動 ThingWorx 伺服器。