在 Microsoft Entra ID 中建立企業應用程式
1. 在 Microsoft Azure 入口網站中的 Microsoft Entra ID 選單下,選取 Enterprise applications 選項。
2. 在右側開啟的頁面中,按一下 New application。
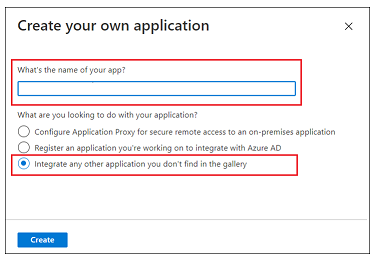
3. 在 Browse Microsoft Entra Gallery (Preview) 頁中,按一下 Create your own application。
4. 輸入應用程式的名稱,選取 Integrate any other application you don't find in the gallery,然後按一下 Create。
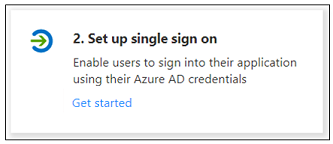
5. 在 Overview 頁中,按一下 Set up a single sign on。
6. 在 Select a single sign-on method 畫面中,選取 SAML 選項。即會開啟具有編號步驟的 Set up Single Sign-On with SAML 頁。在以下各部份中,完成詳細步驟。
步驟 1 - 基本 SAML 組態
1. 在步驟 1 中,針對 Basic SAML Configuration,按一下 Edit。
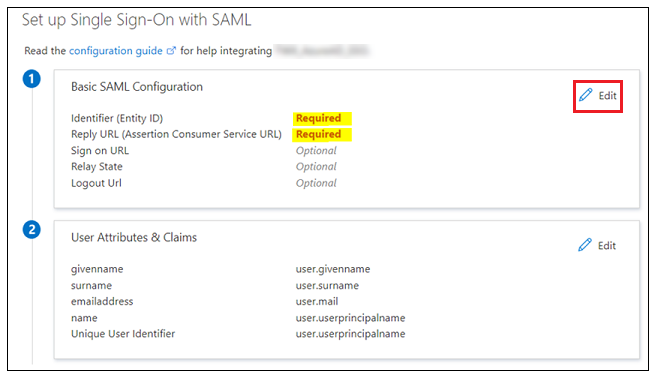
2. 可在 Basic SAML Configuration 中輸入下列資訊:
◦ Indentifier (Entity ID) - Identifier 或 Entity ID 是可用于 shibboleth2.xml 或 Metadata.xml 中的 Shibboleth (SP) 實體 ID。
▪ Shibboleth2.xml 位於 shibboleth_install_directory/etc/shibboleth/ 中。在 Linux 中,shibboleth_install_directory 為 / directory。
▪ Metadata.xml 可透過 URL https://<shibboleth_server:<port>/Shibboleth.sso/Metadata 從 Shibboleth (SP) 下載。
◦ Reply URL (Assertion Consumer Service URL) - 必須使用下列格式:
https://<shibboleth_server:<port>/Shibboleth.sso/SAML2/POST。如果有多個 Reply URL,請確保使用預設值來進行驗證。
◦ Logout URL - 必須使用下列格式:
https://<shibboleth_server:<port>/Shibboleth.sso/SLO/SOAP
3. 按一下 Save,然後關閉 Basic SAML Configuration。當系統提示您測試單一登入時,選取 No, I'll test later。
即會重新顯示 Set up Single Sign-On with SAML 步驟,並輸入 Identifier、Reply URL 和 Logout URL 值。
步驟 2 - 使用者屬性與宣告
1. 在步驟 2 中針對 User Attributes & Claims 按一下 Edit。
2. 在 User Attributes & Claims 中,按一下 Add new claim。
3. 在 Manage claim 頁中,輸入下列資訊:
◦ 「名稱」 - 輸入 UID。
◦ Source - 選取 Attribute 選項。
4. 在 Source attribute 欄位中,輸入 user.userprincipalname。
5. 按一下 Save 並關閉 Manage Claim 視窗。當系統提示您測試單一登入時,選取 No, I'll test later。
User Attributes & Claims 步驟會以剛剛輸入的值重新顯示。
步驟 3 - SAML 簽署憑證
下載 Federation Metadata XML。下載檔案時,請將其重新命名為 idp-metadata.xml。