將 ThingWorx 配置為資源伺服器
如果要將 ThingWorx 應用程式同時配置為充當資源伺服器,請完成下列步驟中的程序。
步驟 1:將其他識別元新增至 ThingWorx
1. 在 Microsoft Azure 入口網站中,導覽至 Enterprise applications 並選取企業應用程式。
2. 從 Manage 選單中,按一下 Single sign-on,然後在 Basic SAML Configuration section 中,按一下 Edit。

3. 在 Basic SAML configuration 視窗中,新增識別元。識別元必須包括前綴 api:// 以及充當資源伺服器之 ThingWorx 應用程式的 Enterprise Application ID。

4. 按一下 Save。
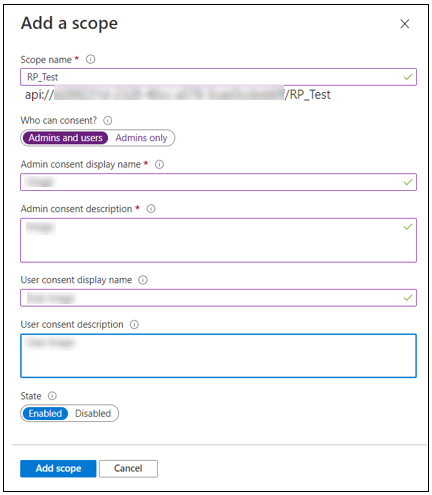
步驟 2:建立並公開 ThingWorx 中的範圍 - 當 ThingWorx 為資源伺服器時
1. 在 Microsoft Azure 入口網站的 Manage 選單下,選取 App registrations。
2. 從 All applications 中,選取您的 ThingWorx 應用程式。
3. 在 Manage 選單下,選取 Expose an API。
4. 按一下 Add a scope。
5. 在 Add a scope 快顯視窗中,新增範圍詳細資訊,然後按一下 Add scope。
步驟 3:在 ThingWorx 中建立並公開角色 (選用)
|
|
請僅在 ThingWorx 為資源伺服器且需要 OAuth M2M 時,才執行此步驟。
|
1. 在 Microsoft Azure 入口網站的 Manage 選單下,選取 App registrations。
2. 從 All applications 中,選取您的 ThingWorx 應用程式。
3. 在 Manage 選單下,選取 App Roles。
4. 選取 Create App Role。
5. 在 Create app role 快顯視窗中,新增角色詳細資訊,如下面的範例圖像所示,然後選取 Apply。
1. Value:您無法重複使用在上述步驟 2 中設定的範圍名稱 (THINGWORX)。請提供不同的值,例如 THINGWORX_ROLE。
2. Allowed member types:選取 Applications。

|
|
您還需要更新 resourceServerSettings.json,如下所示:
"globalScopes": "THINGWORX,THINGWORX_ROLE"
如需詳細資訊,請參閱將 ThingWorx 配置為資源提供者。
|
步驟 4:將公開的 ThingWorx 範圍與/或角色新增至用戶端應用程式
1. 在 Microsoft Azure 入口網站的 Manage 選單下,選取 App registrations。
2. 從 All applications 中,選取用戶端應用程式。
3. 在 Manage 選單下,選取 API permissions。
4. 按一下 Add a permission。即會開啟一個快顯視窗。
5. 按一下 APIs my organization uses,然後選取 ThingWorx 資源伺服器應用程式。
6. 在 Request API permissions 快顯視窗中的 Select permissions 下,選取 ThingWorx 資源伺服器的公開範圍與/或角色。
7. 按一下 Add permission。
Configured Permissions 清單會更新,以顯示新增的權限。

步驟 5:為 <租用戶> 授與管理員同意
|
|
請僅在完成步驟 3 (公開角色) 並在步驟 4 提供此角色的權限之後,才執行此步驟。
|
在用戶端應用程式註冊頁 (與步驟 4 相同),按一下 Grant admin consent for <tenant> 按鈕。
|
|
已向指定租用戶授與您的所有權限。如果您要將某些委派權限保持未授與狀態,請按一下 Revoke admin consent,單獨撤銷同意。
|
步驟 6:配置 resourceServerSetting.json 檔案
根據您的 ThingWorx 版本,如需詳細的組態步驟,請參閱下列任一主題。
• ThingWorx 10.0:將 ThingWorx 配置為資源伺服器
• ThingWorx 9.7:將 ThingWorx 配置為資源伺服器
• ThingWorx 9.6:將 ThingWorx 配置為資源伺服器
• ThingWorx 9.5:將 ThingWorx 配置為資源伺服器
• ThingWorx 9.0 至 ThingWorx 9.4:將 ThingWorx 配置為資源伺服器