以 ThingWorx 作為 AD FS 應用程式群組中的資源伺服器配置用戶端應用程式
步驟 1:為資源伺服器 (ThingWorx) 建立新的應用程式群組
1. 在 AD FS 中,按一下選單中的 Application Groups。
2. 從 Actions 選單中,按一下 Add Application Group。
3. 在 Add Application Group Wizard 的 Welcome 頁中,輸入新應用程式群組的 Name,然後從 Standalone applications 清單選取 Web API 範本。然後按一下「下一步」。

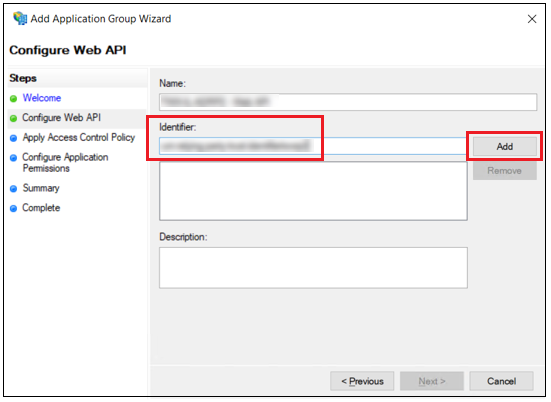
4. 在 Configure Web API 頁上,Name 欄位會自動填入。請完成下列步驟,如下圖所示。
◦ 在 Identifier 欄位中,為 Web API 資源設定具唯一性的受信任識別元。
將識別元複製到文字編輯器中,以便在稍後的程序中使用。
◦ 按一下「新增」。
◦ 按一下 Next。
5. 在 Apply Access Control Policy 頁上,選擇存取控制原則,然後按一下 Next。
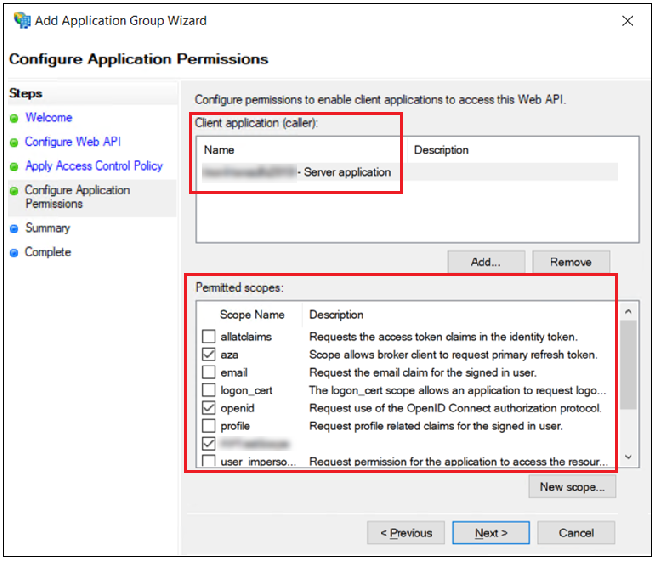
6. 在 Configure Application Permissions 頁中,完成下列步驟:
◦ 在 Client application 面板中,新增用戶端應用程式的伺服器名稱。
◦ 在 Permitted scopes 面板中,選取允許範圍的核取方塊。例如下圖中所選取的範圍。
7. 按一下 Next。
8. 在 Summary 頁中,按一下 Next。
9. 完成精靈步驟後,按一下 Close。
步驟 2:更新已建立應用程式群組的內容
1. 在 AD FS 的 Application Groups 清單中,連按兩下為 ThingWorx 資源伺服器建立的應用程式群組。
2. 選取 ThingWorx Web API 應用程式,然後按一下 Edit。
3. 選擇 Issuance Transform Rules 標籤,然後按一下 Add Rule。
4. 針對 Choose Rule Type,選取 Send LDAP Attributes as Claims,然後按一下 Next。
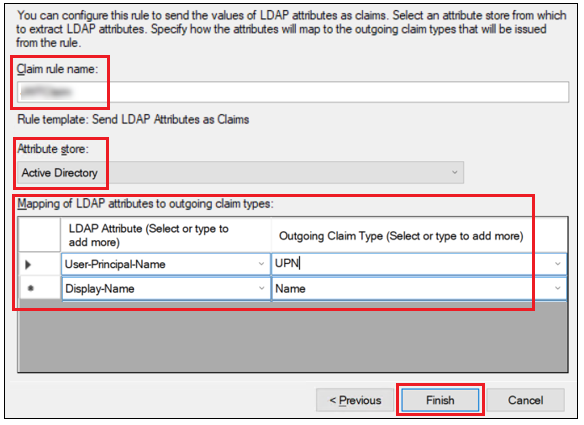
5. 在 Configure Claim Rule 頁上,輸入下列資訊:
◦ Claim rule name - 輸入宣告規則的名稱。
◦ Attribute store - Active Directory。
◦ Mapping of LDAP attributes to outoing claim types - 填入以下屬性,如下圖所示:
▪ User-Principal-Name - 將其對應至傳出宣告 UPN。
▪ Display-Name - 將其對應至傳出宣告 Name。
6. 按一下 Finish。
步驟 3:配置 resourceServerSetting.json 檔案
根據您的 ThingWorx 版本,如需詳細的組態步驟,請參閱下列任一主題。
• ThingWorx 9.5 及更新版本:將 ThingWorx 配置為資源伺服器
• ThingWorx 9.0 至 ThingWorx 9.4:將 ThingWorx 配置為資源伺服器