在 Microsoft Entra ID 中创建企业应用程序
您可以使用 OIDC 或 SAML 身份验证来配置应用程序。转至与您使用的身份验证相关的小节。
使用 OIDC 身份验证
1. 在 Microsoft Azure 门户的 Microsoft Entra ID 菜单下,选择 Enterprise applications 选项。
2. 在右侧打开的页面中,单击 New application。
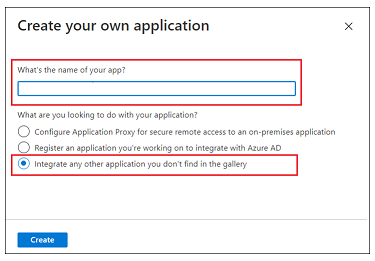
3. 在 Browse Microsoft Entra Gallery (Preview) 页面中,单击 Create your own application。
4. 输入应用程序名称、选择 Integrate any other application you don’t find in the gallery 选项,然后单击 Create。
5. 在 Properties 页面上,单击 application registration。请完成下述详细步骤
步骤 1 - 基本 OIDC 身份验证
1. 选择 Authentication 页面。
2. 在 Platform configurations 中,单击 Add a platform。
3. 选择 Web。Configure Web 页面随即打开。
4. 在 Redirect URIs 字段中,按以下格式添加重定向 URI:https://<ThingWorx FQDN>:<port>/Thingworx/oidc/SSO,然后单击 Configure。
步骤 2 - 令牌配置
1. 选择 Token configuration,然后单击 Add optional claim。Add optional claim 页面随即打开。
2. 在 Token type 中,选择 ID。
3. 选择要合并到标记中的所有声明,然后单击 Add。
4. 选择 Turn on the Microsoft Graph email, profile permission (required for claims to appear in token). 框并单击 Add。
使用 SAML 身份验证
1. 在 Microsoft Azure 门户的 Microsoft Entra ID 菜单下,选择 Enterprise applications 选项。
2. 在右侧打开的页面中,单击 New application。
3. 在 Browse Microsoft Entra Gallery (Preview) 页面中,单击 Create your own application。
4. 输入应用程序名称、选择 Integrate any other application you don’t find in the gallery 选项,然后单击 Create。
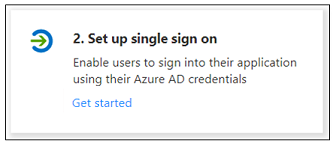
5. 在 Overview 页面上,单击 Set up a single sign on。
6. 在 Select a single sign-on method 屏幕上,选择 SAML 选项。随即将打开带有带编号步骤的 Set up Single Sign-On with SAML 页面。请完成下述详细步骤。
步骤 1 - 基本 SAML 配置
1. 在步骤 1 Basic SAML Configuration 中,单击 Edit。
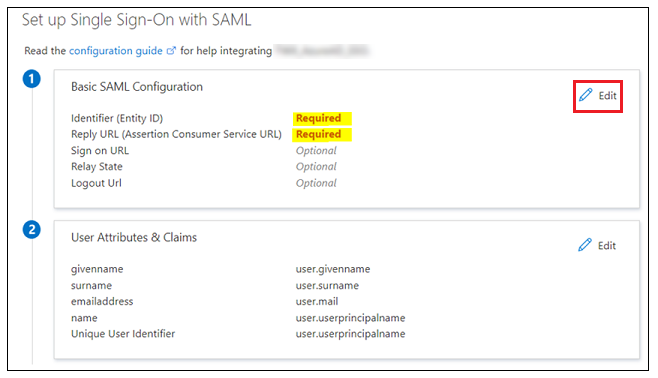
2. 在 Basic SAML Configuration 中,输入以下信息:
▪ Indentifier (Entity ID) - 将用作 sso-settings.json 文件的 BasicSettings 组件内的 metadataEntityId 值。
▪ Reply URL (Assertion Consumer Service URL) - 根据您的 ThingWorx 版本,使用以下格式之一:
▪ ThingWorx 10.0.x 及更高版本:https://<ThingWorx_FQDN>:<端口>/Thingworx/login/saml2/sso
▪ ThingWorx 9.7.x 及更低版本:https://<ThingWorx_FQDN>:<端口>/Thingworx/saml/SSO
3. 单击 Save,然后关闭 Basic SAML Configuration。当系统提示您测试单一登录时,请选择 No, I’ll test later。
随即将重新显示 Set up Single Sign-On with SAML 步骤,并输入 Identifier 和 Reply URL 值。
步骤 2 - 用户属性和声明
1. 在步骤 2 User Attributes & Claims 中单击 Edit。
2. 在 User Attributes & Claims 中单击 Add new claim。
3. 在 Manage claim 页面中,输入以下信息:
▪ Name - 输入 UID。
▪ Source - 选择 Tranformation 选项。随即将打开 Manage transformation 弹窗。
4. 如下图所示,在 Manage transformation 窗口中,输入以下信息:
▪ Transformation – StartWith()
▪ Paramter 1 (Input) – user.userprincipalname
▪ Value – Administrator@
▪ Parameter 2 (Output) – “Administrator”
▪ Specify output if no match - 选中该复选框。
▪ Parameter 3 (Output if no match) – user.userprincipalname
5. 单击 Add。
6. 单击 Save 并关闭 Manage Claim 窗口。当系统提示您测试单一登录时,请选择 No, I’ll test later。
User Attributes & Claims 步骤将以刚输入的值重新显示。
步骤 3 - SAML 签名证书
1. 在步骤 3 SAML Signing Certificate 中,下载 Microsoft Entra ID 公共证书 Certificate (Raw)。
2. 下载 Federation Metadata XML。下载完文件后,将其重命名为 sso-idp-metadata.xml。