将 ThingWorx 配置为资源服务器
如果要将 ThingWorx 应用程序同样配置为充当资源服务器,那么请完成以下步骤中的过程。
步骤 1:为 ThingWorx 添加其他标识符
1. 在 Microsoft Azure 门户中,导航至 Enterprise applications,然后选择企业应用程序。
2. 在 Manage 菜单中,单击 Single sign-on,然后在 Basic SAML Configuration section 中,单击 Edit。

3. 在 Basic SAML configuration 窗口中,添加新标识符。该标识符必须包含前缀 api://,以及将充当资源服务器的 ThingWorx 应用程序的 Enterprise Application ID。

4. 单击 Save。
步骤 2:在 ThingWorx 中创建并公开范围 - 当 ThingWorx 为资源服务器时
1. 在 Microsoft Azure 门户的 Manage 菜单下,选择 App registrations。
2. 在 All applications 中,选择您的 ThingWorx 应用程序。
3. 在 Manage 菜单下,选择 Expose an API。
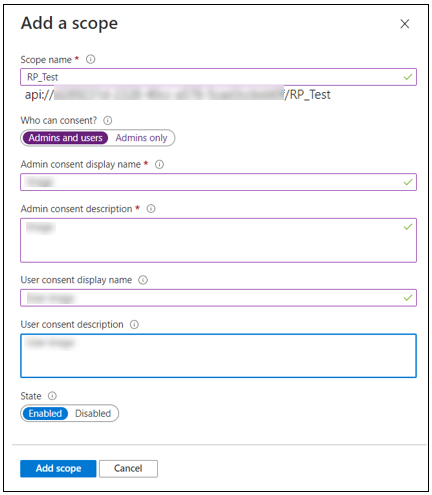
4. 单击 Add a scope。
5. 在 Add a scope 弹出窗口中,添加范围详细信息,然后单击 Add scope。
步骤 3:在 ThingWorx 中创建并公开角色 (可选)
|
|
仅当 ThingWorx 为资源服务器且需要 OAuth M2M 时,才执行此步骤。
|
1. 在 Microsoft Azure 门户的 Manage 菜单下,选择 App registrations。
2. 在 All applications 中,选择 ThingWorx 应用程序。
3. 在 Manage 菜单下,选择 App Roles。
4. 选择 Create App Role。
5. 在 Create app role 弹出窗口中,按下面的示例图像所示添加角色详情,然后选择 Apply。
1. Value:不能复用在上面的步骤 2 中设置的范围名称 (THINGWORX)。提供其他值,例如 THINGWORX_ROLE。
2. Allowed member types:选择 Applications。

|
|
还需要按如下所示更新 resourceServerSettings.json:
"globalScopes": "THINGWORX,THINGWORX_ROLE"
有关详情,请参阅将 ThingWorx 配置为资源提供者。
|
步骤 4:将公开的 ThingWorx 范围和/或角色添加至客户端应用程序
1. 在 Microsoft Azure 门户的 Manage 菜单下,选择 App registrations。
2. 在 All applications 中,选择客户端应用程序。
3. 在 Manage 菜单下,选择 API permissions。
4. 单击 Add a permission。随即将打开一个弹出窗口。
5. 单击 APIs my organization uses,然后选择 ThingWorx 资源服务器应用程序。
6. 在 Request API permissions 弹出窗口中的 Select permissions 下,选择 ThingWorx 资源服务器的公开范围和/或角色。
7. 单击 Add permission。
随即将更新 Configured Permissions 列表以显示添加的权限。

步骤 5:为 <租户> 授予管理员同意
|
|
仅当完成步骤 3 (公开角色) 并在步骤 4 中为此角色提供了权限后,才需要执行此步骤。
|
在客户端应用注册页面 (与步骤 4 相同) 上,单击 Grant admin consent for <tenant> 按钮。
|
|
这会将您的所有权限均授予给指定租户。如果要保持一些委派权限不授予给租户,请单击 Revoke admin consent 以单独撤消同意。
|
步骤 6:配置 resourceServerSetting.json 文件
根据您所使用的 ThingWorx 版本,选择以下两个主题之一来了解详细配置步骤。
• ThingWorx 10.0:将 ThingWorx 配置为资源服务器
• ThingWorx 9.7:将 ThingWorx 配置为资源服务器
• ThingWorx 9.6:将 ThingWorx 配置为资源服务器
• ThingWorx 9.5:将 ThingWorx 配置为资源服务器
• ThingWorx 9.0 到 ThingWorx 9.4:将 ThingWorx 配置为资源服务器