Microsoft Entra ID에서 엔터프라이즈 응용 프로그램 만들기
1. Microsoft Azure 포털의 Microsoft Entra ID 메뉴에서 Enterprise applications 옵션을 선택합니다.
2. 오른쪽에 열리는 페이지에서 New application을 클릭합니다.
3. Browse Microsoft Entra Gallery (Preview) 페이지에서 Create your own application을 클릭합니다.
4. 응용 프로그램 이름을 입력하고 Integrate any other application you don't find in the gallery 옵션을 선택한 다음 Create를 클릭합니다.

5. Overview 페이지에서 Set up a single sign on을 클릭합니다.
6. Select a single sign-on method 화면에서 SAML 옵션을 선택합니다. 번호가 매겨진 단계가 있는 Set up Single Sign-On with SAML 페이지가 열립니다. 아래 단원에서 세부 단계를 완료합니다.
1단계 - 기본 SAML 구성
1. 1단계 Basic SAML Configuration에서 Edit을 클릭합니다.
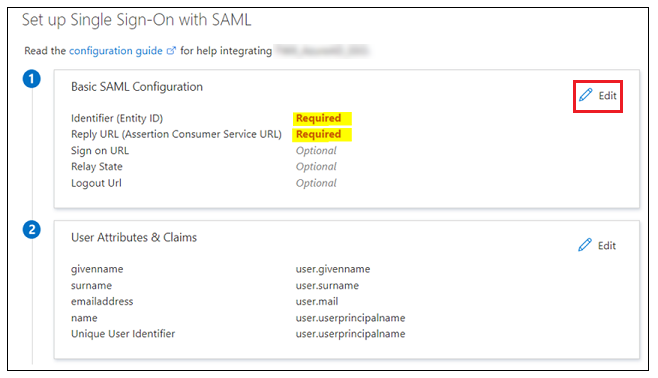
2. Basic SAML Configuration에서 다음 정보를 입력할 수 있습니다.
◦ Indentifier (Entity ID) – Identifier 또는 Entity ID는 shibboleth2.xml 또는 Metadata.xml에서 사용 가능한 Shibboleth(SP) 엔티티 ID입니다.
▪ Shibboleth2.xml은 shibboleth_install_directory/etc/shibboleth/에 있습니다. Linux에서 shibboleth_install_directory는 / directory입니다.
▪ Metadata.xml은 URL https://<shibboleth_server:<port>/Shibboleth.sso/Metadata의 Shibboleth(SP)에서 다운로드할 수 있습니다.
◦ Reply URL (Assertion Consumer Service URL) – 다음 형식을 사용해야 합니다.
https://<shibboleth_server:<port>/Shibboleth.sso/SAML2/POST. 여러 Reply URL이 있는 경우 인증에 기본값이 사용되는지 확인하십시오.
◦ Logout URL - 다음 형식을 사용해야 합니다.
https://<shibboleth_server:<port>/Shibboleth.sso/SLO/SOAP
3. Save를 클릭한 다음 Basic SAML Configuration을 닫습니다. Single Sign-On을 테스트할지 묻는 메시지가 표시되면 No, I'll test later를 선택합니다.
Identifier, Reply URL 및 Logout URL 값이 입력된 상태로 Set up Single Sign-On with SAML 단계가 다시 나타납니다.
2단계 - 사용자 특성 및 클레임
1. 2단계 User Attributes & Claims에서 Edit을 클릭합니다.
2. User Attributes & Claims에서 Add new claim을 클릭합니다.
3. Manage claim 페이지에서 다음 정보를 입력합니다.
◦ Name – UID를 입력합니다.
◦ Source – Attribute 옵션을 선택합니다.
4. Source attribute 필드에 user.userprincipalname을 입력합니다.
5. Save를 클릭하고 Manage Claim 창을 닫습니다. Single Sign-On을 테스트할지 묻는 메시지가 표시되면 No, I'll test later를 선택합니다.
방금 입력한 값과 함께 User Attributes & Claims 단계가 다시 표시됩니다.
3단계 - SAML 서명 인증서
Federation Metadata XML을 다운로드합니다. 파일 다운로드가 완료되면 이름을 idp-metadata.xml로 바꿉니다.