Microsoft Entra ID でのエンタープライズアプリケーションの作成
OIDC 認証または SAML 認証を使用してアプリケーションを設定できます。お使いの認証に関連するセクションに進みます。
OIDC 認証の使用
1. Microsoft Azure ポータルで、「Microsoft Entra ID」メニューの「Enterprise applications」オプションを選択します。
2. 右側に開いたページで、「New application」をクリックします。
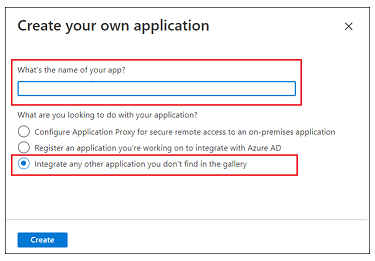
3. 「Browse Microsoft Entra Gallery (Preview)」ページで、「Create your own application」をクリックします。
4. アプリケーションの名前を入力し、「Integrate any other application you don't find in the gallery」オプションを選択して「Create」をクリックします。
5. 「Properties」ページで、「application registration」をクリックします。以下の各セクションで、詳細な手順を実行します。
手順 1 - Basic OIDC Authentication
1. 「Authentication」ページを選択します。
2. 「Platform configurations」で、「Add a platform」をクリックします。
3. 「Web」を選択します。「Configure Web」ページが開きます。
4. 「Redirect URIs」フィールドに、https://<ThingWorx FQDN>:<port>/Thingworx/oidc/SSO というフォーマットでリダイレクト URI を追加し、「Configure」をクリックします。
手順 2 - Token Configuration
1. 「Token configuration」を選択し、「Add optional claim」をクリックします。「Add optional claim」ページが開きます。
2. 「Token type」で、「ID」を選択します。
3. トークンに組み込む要求をすべて選択し、「Add」をクリックします。
4. 「Turn on the Microsoft Graph email, profile permission (required for claims to appear in token).」ボックスをオンにし、「Add」をクリックします。
SAML 認証の使用
1. Microsoft Azure ポータルで、「Microsoft Entra ID」メニューの「Enterprise applications」オプションを選択します。
2. 右側に開いたページで、「New application」をクリックします。
3. 「Browse Microsoft Entra Gallery (Preview)」ページで、「Create your own application」をクリックします。
4. アプリケーションの名前を入力し、「Integrate any other application you don't find in the gallery」オプションを選択して「Create」をクリックします。
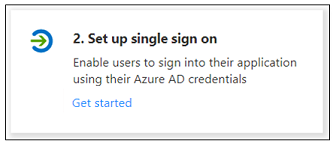
5. 「Overview」ページで、「Set up a single sign on」をクリックします。
6. 「Select a single sign-on method」画面で、「SAML」オプションを選択します。「Set up Single Sign-On with SAML」ページが開き、番号付きの手順が示されます。以下の各セクションで、詳細な手順を実行します。
手順 1 - Basic SAML Configuration
1. 手順 1 の「Basic SAML Configuration」で、「Edit」をクリックします。
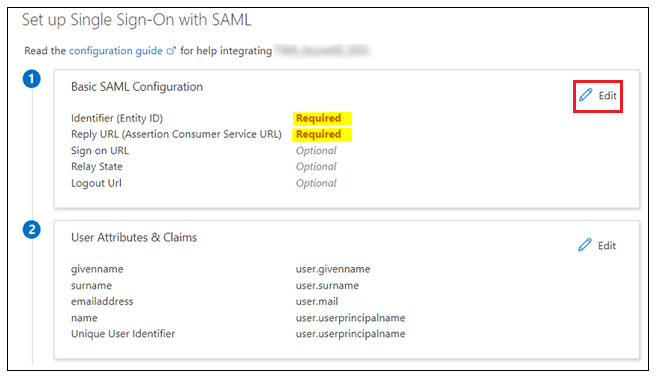
2. 「Basic SAML Configuration」で、以下の情報を入力します。
▪ 「Indentifier (Entity ID)」 - これは sso-settings.json ファイルの BasicSettings コンポーネントの metadataEntityId の値として使用されます。
▪ 「Reply URL (Assertion Consumer Service URL)」 - ThingWorx のバージョンに応じて、次のいずれかのフォーマットを使用します。
▪ ThingWorx 10.0.x 以降のバージョンの場合: https://<ThingWorx_FQDN>:<ポート>/Thingworx/login/saml2/sso
▪ ThingWorx 9.7.x 以前のバージョンの場合: https://<ThingWorx_FQDN>:<ポート>/Thingworx/saml/SSO
3. 「Save」をクリックし、「Basic SAML Configuration」を閉じます。シングルサインオンをテストするかどうか尋ねられた場合、「No, I'll test later」を選択します。
「Identifier」と「Reply URL」の値が入力された状態で「Set up Single Sign-On with SAML」の手順が再表示されます。
手順 2 - User Attributes & Claims
1. 手順 2 の「User Attributes & Claims」で、「Edit」をクリックします。
2. 「User Attributes & Claims」で、「Add new claim」をクリックします。
3. 「Manage claim」ページで、以下の情報を入力します。
▪ 「Name」 - UID を入力します。
▪ 「Source」 - 「Tranformation」オプションを選択します。「Manage transformation」ポップアップウィンドウが開きます。
4. 「Manage transformation」ウィンドウで、以下のイメージに示すように、次の情報を入力します。
▪ 「Transformation」 - StartWith()
▪ 「Paramter 1 (Input)」 - user.userprincipalname
▪ 「Value」 - Administrator@
▪ 「Parameter 2 (Output)」 - "Administrator"
▪ 「Specify output if no match」 - このチェックボックスをオンにします。
▪ 「Parameter 3 (Output if no match)」 - user.userprincipalname
5. 「Add」をクリックします。
6. 「Save」をクリックし、「Manage Claim」ウィンドウを閉じます。シングルサインオンをテストするかどうか尋ねられた場合、「No, I'll test later」を選択します。
入力した値を使用して「User Attributes & Claims」の手順が再表示されます。
手順 3 - SAML Signing Certificate
1. 手順 3 の「SAML Signing Certificate」で、Microsoft Entra ID 公開証明書である「Certificate (Raw)」をダウンロードします。
2. 「Federation Metadata XML」をダウンロードします。このファイルをダウンロードした後、名前を sso-idp-metadata.xml に変更します。