Creating, Mapping, and Using Groups
|
|
If you configure SCIM provisioning, do not use the procedures below to create and map groups in Microsoft Entra ID. SCIM groups that are created in Microsoft Entra ID are provisioned automatically to ThingWorx.
|
Create a Group Claim in Microsoft Entra ID — SAML Configuration
This configuration is a one-time effort. |
1. In the Microsoft Azure portal, under the Microsoft Entra ID menu, select Enterprise applications and open the enterprise application that you created previously.
2. In the left navigation panel, select Single sign-on.
3. On the Overview page, select 2. Set up Single Sign-On.
4. Click Edit in Step 2 for User Attributes & Claims.
5. On the next screen, click Add a group claim.
6. On the Group Claims page:
◦ Select All groups.
◦ In the Source attribute field, select Group ID.
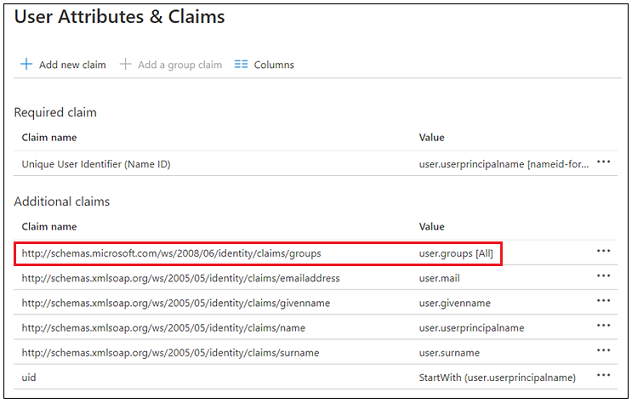
7. Click Save. The new claim entry will be displayed under the Additional claims section of the User Attributes & Claims page, as shown in the image below.
8. Copy the Claim name to a text editor or somewhere you can save it for use in later ThingWorx configuration steps.
Create a Group Claim in Microsoft Entra ID —OIDC Configuration
1. In the Microsoft Azure portal, under the Microsoft Entra ID menu, select App registration and open the application that you created previously.
2. In the left navigation panel, select Token configuration.
3. Click Add group claims.
4. On the Edit groups claim page, select Security groups and click Add.
Create a Group in Microsoft Entra ID
1. In the Microsoft Azure portal, under the Manage menu, select the Groups option to open a groups list page.
2. Click New Group.
3. On the New Group page, enter group details.
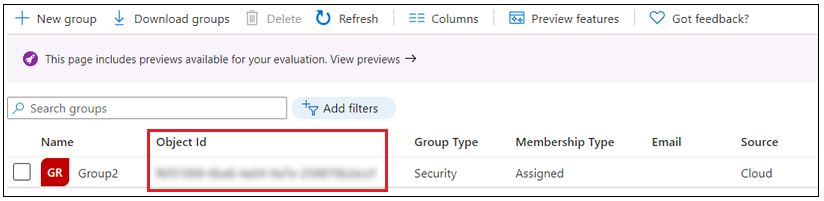
4. Click Create. The new group is displayed on the groups list page.
5. Copy the Object ID to a text editor or somewhere you can save it for use in later ThingWorx configuration steps.
Add Members to the Group
1. On the groups list page in Microsoft Entra ID, click the newly created group.
2. In the left navigation, under the Manage menu, select Members.
3. On the Members page, click Add members.
4. Find and select the members you want to add to the group.
5. Click Select to add the desired members to the group. When the dialog box closes, the newly added members are displayed in the members list for the group.
Once a group has been created in Microsoft Entra ID, a corresponding group must be created and mapped in ThingWorx. |
Create a User Group in ThingWorx
Create a user group in ThingWorx Composer.
For more information, see User Groups in the ThingWorx Help Center.
Map the Group in ThingWorx
1. In ThingWorx Composer, under the Security section of the left navigation panel, click Authenticators and open the ThingworxSSOAuthenticator.
For more information, see Single Sign-On Authenticator in the ThingWorx Help Center.
2. On the Configuration tab, under User Identity Provider Settings, scroll down to the Groups field and enter the Microsoft Entra ID Claim name that you copied into a text editor for later use.
3. Scroll down to Identity Provider Group Mappings and click Add.
4. Enter the following information:
◦ Identity Provider Group Name – Enter the group’s Microsoft Entra ID Object ID that you copied into a text editor for later use.
◦ ThingWorx Group Name
– Enter the name of the corresponding ThingWorx user group that you just created.
5. Click Add to save the mapping information and close the dialog box.
6. Click Save and close the ThingWorxSSOAuthenticator.