Create an Enterprise Application in Microsoft Entra ID
1. In the Microsoft Azure portal, under the Microsoft Entra ID menu, select the Enterprise applications option.
2. In the page that opens on the right, click New application.
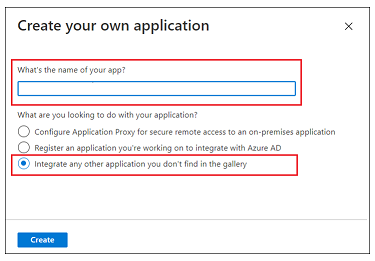
3. In the Browse Microsoft Entra Gallery (Preview) page, click Create your own application.
4. Enter a name for your application, select the Integrate any other application you don’t find in the gallery option, and click Create.
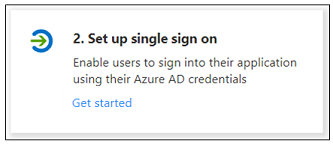
5. On the Overview page, click Set up a single sign on.
6. On the Select a single sign-on method screen, select the SAML option. A Set up Single Sign-On with SAML page with numbered steps opens. In the sections below, complete the detailed steps.
Step 1 – Basic SAML Configuration
1. In step 1 for Basic SAML Configuration, click Edit.

2. In Basic SAML Configuration, you can enter following information:
◦ Indentifier (Entity ID) – Identifier or Entity ID is Shibboleth (SP) entity ID available either in shibboleth2.xml or Metadata.xml.
▪ Shibboleth2.xml is located in shibboleth_install_directory/etc/shibboleth/. On Linux, the shibboleth_install_directory is the / directory.
▪ Metadata.xml can be downloaded from Shibboleth (SP) with the URL https://<shibboleth_server:<port>/Shibboleth.sso/Metadata.
◦ Reply URL (Assertion Consumer Service URL) – Must use the following format:
https://<shibboleth_server:<port>/Shibboleth.sso/SAML2/POST. If you have multiple Reply URL, make sure the default one is used for the authentication.
◦ Logout URL — Must use the following format:
https://<shibboleth_server:<port>/Shibboleth.sso/SLO/SOAP
3. Click Save and then close the Basic SAML Configuration. When prompted to test the single sign-on, select No, I’ll test later.
The Set up Single Sign-On with SAML step is reappears with the Identifier, Reply URL and Logout URLvalues entered.
Step 2 – User Attributes & Claims
1. Click Edit in step 2 for User Attributes & Claims.
2. In User Attributes & Claims, click Add new claim.
3. In the Manage claim page, enter the following information:
◦ Name – Enter a UID.
◦ Source – Select the Attribute option.
4. In the Source attribute field, enter user.userprincipalname.
5. Click Save and close the Manage Claim window. When prompted to test the single sign-on, select No, I’ll test later.
The User Attributes & Claims step is reappears with the values you just entered.
Step 3 – SAML Signing Certificate
Download the Federation Metadata XML. When the file is downloaded, rename it to idp-metadata.xml.