About the Creo Parametric Main Window
Each Creo Parametric object opens in its own Creo Parametric window. You can perform many operations from the ribbon in multiple windows without cancelling pending operations. Only one window is active at a time, but you can still perform some functions in the inactive windows. To activate a window, press CTRL+A.
The Creo Parametric window consists of the following elements:
• Ribbon
• File menu
• Toolbars
• Navigation area
• Graphics window
• Shortcut Menus
◦ mini toolbar
◦ shortcut menu
• Creo Parametric browser
• Status bar
• Full screen mode
Ribbon
The ribbon contains the command buttons organized within a set of tabs. On each tab, the related buttons are grouped. You can customize the ribbon. See
About the Ribbon.
File Menu
The File button in the upper-left corner of the Creo Parametric window opens a menu that contains commands for managing files models, preparing models for distribution, and for setting your Creo Parametric environment and configuration options.
Toolbars
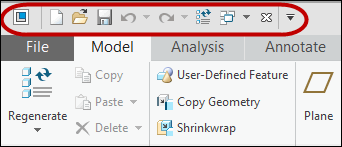
• Quick Access Toolbar—The Quick Access toolbar is available regardless of which tab is selected on the ribbon. By default it is located at the top of the Creo Parametric window. It provides quick access to frequently used buttons, such as buttons for opening and saving files, undo, redo, regenerate, close windows, switch windows, and so on. In addition, you can customize the Quick Access toolbar to include other frequently used buttons and cascading lists from the ribbon.
1. Quick Access toolbar
• Graphics Toolbar—The Graphics toolbar is embedded at the top of the graphics window. The buttons on the toolbar control the display of graphics. You can hide or display the buttons on the toolbar. You can change the location of the toolbar by right-clicking and choosing a location from the shortcut menu.
Mini Toolbar and Shortcut Menu
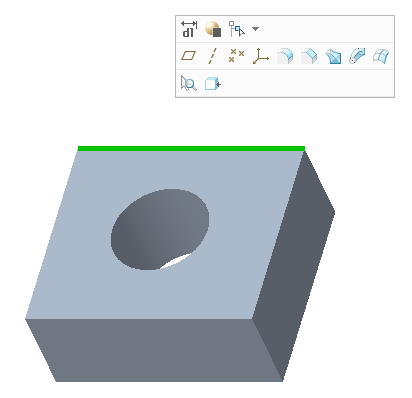
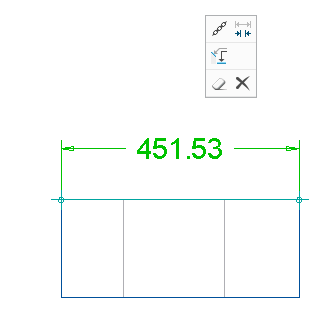
• Mini toolbar — The mini toolbar is part of the shortcut menus which is contextual user interface relative to the selected object. The mini toolbar is displayed immediately after selection on the Graphics window, Model Tree, or Drawing Tree. The mini toolbar shows frequently used and needed commands. It also displays commands related to the extended context, for example, in a part mode, if you create extrude, and select an edge of that extrude, the commands displayed is applicable to the owner feature, extrude, in this case. You can use the commands on the mini toolbar to perform various actions on the selected object. For example, if you select an edge, the mini toolbar displays commands that are specific to the edge.
The following figure shows the mini toolbar with commands that are applicable to the selected edge.
The following figure shows the mini toolbar with commands that are applicable to a drawing annotation.
You can customize the mini toolbar to create your own personalized user interface.
• Shortcut menu — It is contextual user interface relative to the selected object. Press the right mouse button until you see the shortcut menu.
Navigator
The navigator includes the Model Tree, Layer Tree, Detail Tree, Folder browser, and Favorites.

on the status bar controls the display of the navigator.
Graphics Window
The model is displayed in the graphics window to the right of the navigator.
Creo Parametric Browser
The
Creo Parametric browser provides access to internal and external Web sites.

on the status bar controls the display of the browser.
Status Bar
Each Creo Parametric window has a status bar located at the bottom of the Creo Parametric window. When applicable, the status bar displays the following controls and information areas:
• 
— Controls the display of the navigation area.
• — Controls the display of the
Creo Parametric browser.
• Messages Area — Displays one-line messages related to work in a window. Right-click in the message area and then click Message Log to review past messages.
• Server Status Area — Displays Windchill server status when connected to a Windchill server.
• Merged Model List Area — Displays the merged model list in a sheet metal part.
• 
— Appears when
Creo Parametric is doing a lengthy computation. Clicking aborts the computation.
• 
— Displays warning and error shortcuts related to
File >
Event Manager.
• Model Regeneration Status Area — Indicates status of model regeneration.
◦ 
— Regeneration is complete.
◦ 
— Regeneration is required.
◦ 
— Regeneration has failed.
• 
— Opens the
Search Tool dialog box.
• 
— Activates the 3D Selection tool.
• Selection Buffer Area — Displays the number of items selected in the current model.
• Selection Filter Area — Displays the available selection filters.
• Graphics Toolbar Area — Displays the Graphics toolbar if the location of the Graphics toolbar is set to status bar.
Full Screen Mode
You can switch to the full screen mode to maximize the graphic space available on your screen. In the full screen mode, all window elements except the Graphics toolbar are hidden. This increases the graphics window space available to you. Press F11 or click
 Full Screen
 on the status bar to switch between full screen mode and normal mode.
The full screen mode hides the following elements from the Creo window:
• Ribbon
• Quick Access toolbar
• Status bar
• Navigator
The Quick Access toolbar, ribbon, status bar, and navigator are available when you place the pointer on their respective locations.