About Trimming Chamfer Geometry
You can trim chamfer geometry (pieces) to achieve the preferred chamfers for your model. As you create a chamfer, the chamfer geometry automatically propagates across tangent points and then stops at a non-tangent point. If you need to terminate the chamfer geometry before the non-tangent point, you can trim the chamfer piece up to a patch that you select. The table following table illustrates the trim process.
|
|
• You can only trim open chamfer sets. If you want to work with a closed-loop chamfer set, you must first use open the chamfer geometry.
• You cannot trim separate (overlapping) chamfer pieces. To remove one of these pieces, hold down the CTRL key and select the piece, or clear it from its respective collector.
• If you need to terminate chamfer geometry at a different point other than a patch, you must define a Stop at Reference transition.
|
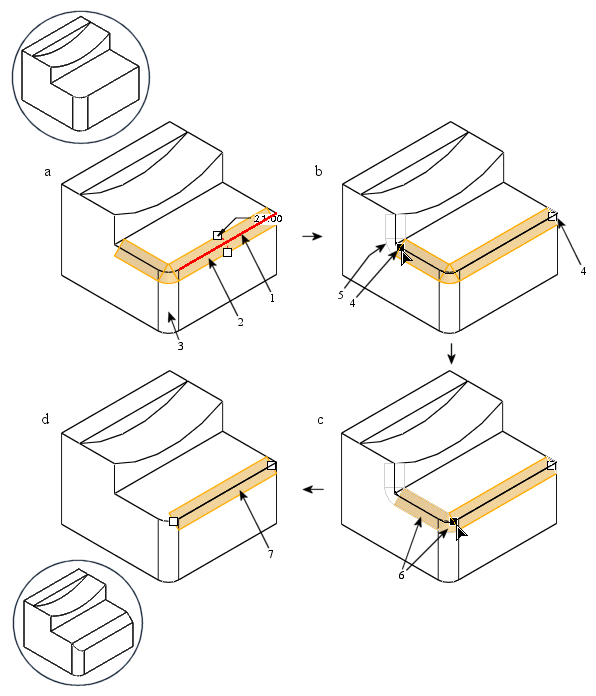
Trimming Chamfer Geometry
• The chamfer placement edge reference is selected and the chamfer geometry propagates across tangent points due to the existing round geometry (a).
• The chamfer piece is selected from the Pieces tab and the trim/extend handles appear (b). As the left handle is dragged to trim the chamfer piece, potential extension geometry appears. Notice that the cursor and handle change during trimming.
• Using the preview geometry as a guide, the handle is dragged to trim up the third patch (c). Notice that the preview geometry outline changes color indicating the extent of the trim.
• Release the mouse button and the chamfer is trimmed up to the patch (d).
1. Edge placement reference
2. Chamfer piece (consisting of three patches)
3. Existing round geometry
4. Trim/Extend handles
5. Potential extension geometry
6. Trimmed patches
7. Trimmed chamfer geometry