練習 8 - 將單一螺絲扣件整合至 PTC Creo Intelligent Fastener 資料庫
1. 在 Windows 檔案總管中,瀏覽至 IFX_custom_lib\ifx_catalogs 並開啟扣件例證型錄檔案 myfasteners.txt。
2. 編輯 myfasteners.txt 檔案以符合下列檔案︰
|
#screws
|
|
shcs
|
|
legacy_fasteners
|
3. 儲存並關閉 myfasteners.txt。
4. 在 Windows 檔案總管中,瀏覽至 IFX_custom_lib\ifx_fastener_data,複製 iso4762-8_8.dat 並將其重新命名為 shcs.dat。
5. 編輯 shcs.dat 以匹配下列檔案。
|
SCREWTYPE
|
1
|
||||||||
|
UNIT
|
MM
|
||||||||
|
SURFACE
|
28
|
||||||||
|
AXIS
|
71
|
||||||||
|
CBSCR
|
DIN974-1 R1
|
||||||||
|
SYMBOL
|
STRING
|
DN
|
LG
|
B
|
S
|
DK
|
K
|
DG
|
P
|
|
INSTANCE
|
STRING
|
DN
|
LG
|
B
|
S
|
DK
|
K
|
DG
|
P
|
|
m8x20-shcs
|
M8
|
8
|
20
|
20
|
6
|
13
|
8
|
6.8
|
1.25
|
|
m8x30-shcs
|
M8
|
8
|
30
|
28
|
6
|
13
|
8
|
6.8
|
1.25
|
6. 儲存並關閉 shcs.dat。
7. 在 Windows 檔案總管中,從 <creo 載入點> 按一下 > > 。configuration 資料夾即會開啟。
8. 在 configuration 資料夾中,開啟 ifx_screw_data.cfg 並審核截面 Diameters of couterbores,以驗證 CBSCR 是否適用於 M8 扣件。關閉檔案。
9. 在 Windows 檔案總管中,從 <creo 載入點> 按一下 > > > 。
10. 在 usascii 資料夾中,開啟資料庫轉換檔案 ifx_translation.txt 並將下列說明文字新增至檔案。
|
shcs.Label
|
|
My M8 Socket Head Cap Screw
|
|
My M8 Socket Head Cap Screw
|
|
shcs.HelpText
|
|
My Socket Head Cap Screw
|
|
My Socket Head Cap Screw
|
|
|
更新想要透過 Creo Parametric 讀取的檔案之後,有時需要重新啟動 Creo Parametric。
|
11. 儲存並關閉 ifx_translation.txt。
12. 在 Windows 檔案總管中,瀏覽至 <已下載檔案位置> \IFXTraining\Legacy_Parts 並將 shcs.prt 複製到 IFX_custom_lib\ifx_fastener_data 資料夾。
13. 在 Creo Parametric 中開啟 shcs.prt 並注意零件不是族表。
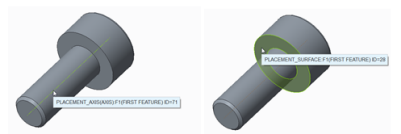
14. 請確定已顯示所有圖層,然後在圖形視窗中,將指標放置在軸上,並注意 ID 為 71。同樣地,將指標放置在扣件頭上,並注意 ID 為 28。
15. 從「模型樹」中選取第一特徵 ID 1,按一下,然後選取「編輯尺寸」(Edit Dimensions)。
16. 按一下 > ,並注意尺寸 DN、DK、LG 和 K。
17. 針對剩餘的兩個特徵重複步驟 15 與 16。
18. 請注意尺寸 LG、K、DK、DN、S 和 DG 與檔案 shcs.dat 表格中的欄的關係。

19. 重新啟動 Creo Parametric。
20. 將工作目錄設定為 <已下載檔案位置> \IFXTraining\Migration_asm。
21. 開啟 ifx_migration.asm。
22. 使用 Creo Intelligent Fastener,選取參照來放置新扣件。「螺絲扣件定義」(Screw Fastener Definition) 對話方塊開啟之後,請注意下列變更︰
◦ 可在「螺絲」(Screw) 清單中選取螺絲類型「我的 M8 承窩頭螺絲」(My M8 Socket Head Cap Screw)。
◦ 工具提示為「我的承窩頭螺絲」(My Socket Head Cap Screw)。
23. 完成 M8x20 與 M8x30 的放置。
24. 請注意零件是透過 shcs.dat 中的值與 shcs.prt 中的相關尺寸即時建立的。
25. 關閉組件而不進行儲存。
26. 按一下 > > 。「拭除未顯示項目」(Erase Not Displayed) 對話方塊開啟。
27. 按一下「確定」(OK) 以拭除記憶體中的所有檔案。