Exercise 8 – Integrating a Single Screw Fastener into the PTC Creo Intelligent Fastener Library
1. In Windows Explorer browse to IFX_custom_lib\ifx_catalogs and open the Fastener Instance Catalog File myfasteners.txt.
2. Edit the myfasteners.txt file to match the file below:
|
#screws
|
|
shcs
|
|
legacy_fasteners
|
3. Save and close myfasteners.txt.
4. In Windows Explorer browse to IFX_custom_lib\ifx_fastener_data , copy iso4762-8_8.dat and rename it to shcs.dat.
5. Edit shcs.dat to match the file below.
|
SCREWTYPE
|
1
|
||||||||
|
UNIT
|
MM
|
||||||||
|
SURFACE
|
28
|
||||||||
|
AXIS
|
71
|
||||||||
|
CBSCR
|
DIN974-1 R1
|
||||||||
|
SYMBOL
|
STRING
|
DN
|
LG
|
B
|
S
|
DK
|
K
|
DG
|
P
|
|
INSTANCE
|
STRING
|
DN
|
LG
|
B
|
S
|
DK
|
K
|
DG
|
P
|
|
m8x20-shcs
|
M8
|
8
|
20
|
20
|
6
|
13
|
8
|
6.8
|
1.25
|
|
m8x30-shcs
|
M8
|
8
|
30
|
28
|
6
|
13
|
8
|
6.8
|
1.25
|
6. Save and close shcs.dat.
7. In Windows Explorer, from the <creo_loadpoint>, click > > . The configuration folder opens.
8. In the configuration folder, open ifx_screw_data.cfg and review the section, Diameters of couterbores, to validate if the CBSCR is suitable for M8 fasteners. Close the file.
9. In Windows Explorer, from the <creo loadpoint> click > > > .
10. In the usascii folder, open the library translation file ifx_translation.txt and add the following help text to the file.
|
shcs.Label
|
|
My M8 Socket Head Cap Screw
|
|
My M8 Socket Head Cap Screw
|
|
shcs.HelpText
|
|
My Socket Head Cap Screw
|
|
My Socket Head Cap Screw
|
|
|
After updating files that you want read by Creo Parametric, a restart of Creo Parametric is sometimes required.
|
11. Save and close ifx_translation.txt .
12. In Windows Explorer, browse to <downloaded files location>\IFXTraining\Legacy_Parts and copy shcs.prt, to the IFX_custom_lib\ifx_fastener_data folder.
13. In Creo Parametric, open shcs.prt and notice that the part is not a family table.
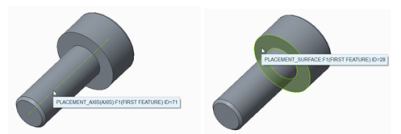
14. Be sure that all layers are visible and then in the graphics window, place the pointer on the axis and note that the ID is 71. Similarly, place the pointer on the fastener head and note that the ID is 28.
15. From the Model Tree, select First Feature id 1, click, and select Edit Dimensions.
16. Click > and notice the dimensions DN, DK, LG, and K.
17. Repeat steps 15 and 16 for the remaining two features.
18. Notice how the dimensions, LG, K, DK, DN, S, K and DG relate to the columns in the table of file shcs.dat.

19. Restart Creo Parametric.
20. Set the working directory to <downloaded files location>\IFXTraining\Migration_Asm.
21. Open ifx_migration.asm.
22. Using Creo Intelligent Fastener, select the references to place a new fastener. After the Screw Fastener Definition dialog box opens note the following changes:
◦ The screw type My M8 Socket Head Cap Screw is available for selection in the Screw list.
◦ The tooltip is My Socket Head Cap Screw.
23. Complete the placement of M8x20 and M8x30.
24. Notice the parts are created on-the-fly using the values in shcs.dat and using the related dimensions in shcs.prt.
25. Close the assembly without saving.
26. Click > > . The Erase Not Displayed dialog box opens.
27. Click OK to erase all files from memory.