Exercise 2 – Assembling Fasteners on All Instances and Patterning
1. In Creo Parametric set the working directory to <downloaded files location>\IFXTraining\IFX_Asm\Exercise2 and open ifx-exercise-2.asm.
2. Click > and then click GLASS.
3. Click > > . The Select References dialog box opens and the Position Reference box is activated.
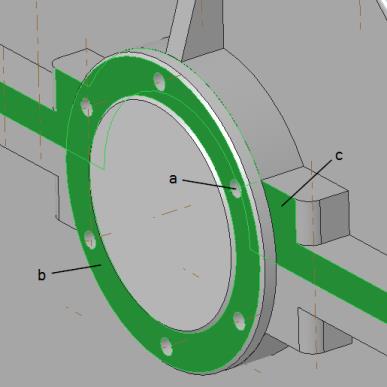
4. Refer to the diagram below and select the references as described in the list below:

a. Select the axis as the Position Reference
b. Select the surface for Screw head placement.
c. Select the surface for Nut or Thread surface placement.
5. Click OK. The Screw Fastener Definition dialog box opens.
6. Configure screw connections using the Screw Fastener Definition dialog box as follows:
a. In the Screw box, select ISO 14579–8.8.
b. Click  Measure a diameter and select the area around the axis you selected in step 3a.
 Measure a diameter and select the area around the axis you selected in step 3a.
c. Select the Side 1 Washers check box.
d. Click  Set length automatically.
 Set length automatically.
7. Click OK to close the dialog box. The Additional Options dialog box opens.
8. Select > and click OK.
The threaded holes are created in the housing part but are not created in the housing cover part. |
9. Click Tools and then in the Intelligent Fastener group, click Delete.
10. Select one of the Socket Head Cap Screws. You are prompted to delete the fastener.
11. Click Yes. All the fasteners in the pattern are deleted.
12. Click > > . The Select References dialog box opens.
13. Select the same references as described in steps 4a through 4c in this exercise. Notice that the same settings are still available in the Screw Fastener Definition dialog box.
14. Click OK to close the dialog box. The Additional Options dialog box opens.
15. Select > and then click OK to close the dialog box. Holes are created in the housing cover and the housing part.
16. Save and close the assembly.
17. Click > > . The Erase Not Displayed dialog box opens.
18. Click OK to erase all files from memory.
 Saved Orientations
 Assemble on reference