To Create a Curve on Surface (COS) by Drop
Use the  Drop Curve tool to create a curve on surface by projecting an existing curve onto one or more surfaces, datum planes, intent surface, or quilts.
Drop Curve tool to create a curve on surface by projecting an existing curve onto one or more surfaces, datum planes, intent surface, or quilts.1. Click  Style > Drop Curve. The Drop Curve tab opens.
Style > Drop Curve. The Drop Curve tab opens.2. Click the  Curves collector, and then select one or more curves to drop. You can also use the Curves collector on the References tab.
Curves collector, and then select one or more curves to drop. You can also use the Curves collector on the References tab.The curves can either be internal or external to the current Style feature. |
3. Click the  Surfaces collector, and then select one or more surfaces, datum planes, intent surfaces, quilts, or bodies on which to drop the curve. You can also use the Surfaces collector on the References tab.
Surfaces collector, and then select one or more surfaces, datum planes, intent surfaces, quilts, or bodies on which to drop the curve. You can also use the Surfaces collector on the References tab.The surfaces can either be internal or external to the current Style feature. |
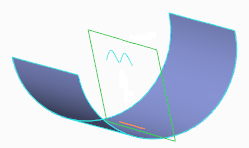
4. If required, change the reference direction by clicking the  Direction plane collector and selecting a datum plane, planar surface, or intent plane. You can also use the Direction plane collector on the References tab. The curves are projected onto the surface normal to the selected plane.
Direction plane collector and selecting a datum plane, planar surface, or intent plane. You can also use the Direction plane collector on the References tab. The curves are projected onto the surface normal to the selected plane.By default, the active plane is selected as the direction reference for dropping the curves onto the surface. |
5. Perform one of the following actions:
◦ To drop the curve normal to a surface:
▪ Under Direction, select Normal to surface.
◦ To drop the curve onto one or more surfaces, datum planes, intent surfaces, quilts, or bodies:
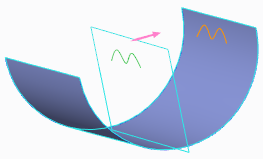
1. Under Direction, select Along direction.
2. If required, change the drop direction by clicking  or the arrows in the graphics window to cycle between the drop directions.
or the arrows in the graphics window to cycle between the drop directions.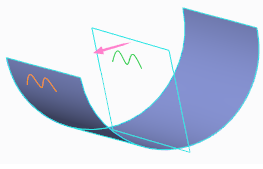
6. To extend the start or end point of the drop curve to the nearest surface boundary, click the Options tab, and then select the Start or End check box.
• When you select more than one curve to drop, the start points or end points for all the drop curves extend to the nearest surface boundary. • When you drop curves onto a datum plane, you cannot extend the start or end point. |
7. Click  OK.
OK.
OK.