Displaying Particles in Results
Use the display of particles to visualize the velocity of particles within a fluid flow study. This display option is only available for velocity results. When you click Particles, particles appear for each fluid inlet. The direction of particle flow is the same as that of the inlet flow.
To Display Particles in Results
Click  Particles to view the velocity of particles in the fluid. By default the entire inlet is used as an emission zone and particles cover almost the entire domain as seen in the following figure.
Particles to view the velocity of particles in the fluid. By default the entire inlet is used as an emission zone and particles cover almost the entire domain as seen in the following figure.
Selecting Particle Emitters
A particle emitter allows you to visualize how the flow originates. You can change the position, size, shape, and orientation of the particle emitter. The particle emitter cannot be selected by default. To allow selection of the particle emitter, perform the following steps:
1. Click Particles to display particles in the display.
Particles to display particles in the display.2. Click >  Particle Options to open the Animation Options dialog box.
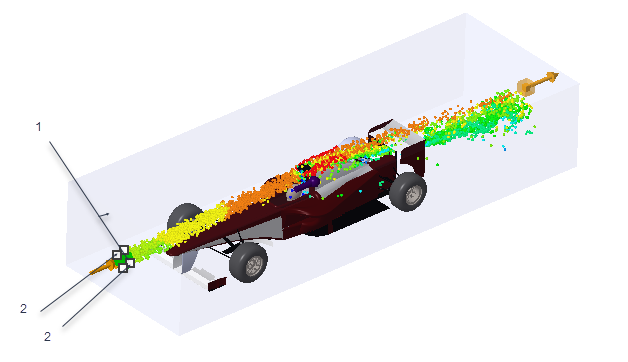
Particle Options to open the Animation Options dialog box.3. Click  to open the particle emitter. You can now select particle emitters from the graphics window as shown in the following figure.
to open the particle emitter. You can now select particle emitters from the graphics window as shown in the following figure.
1. Enclosure volume
2. Particle emitter
Adding Particle Emitters
1. Click Particles to turn on the display of particles.
Particles to turn on the display of particles.2. Click > Particle Options to open the Animation Options dialog box. Ensure that the  button is pressed (particle mode) so that you can select particle emitters.
Particle Options to open the Animation Options dialog box. Ensure that the button is pressed (particle mode) so that you can select particle emitters.3. Right-click anywhere in the graphics window and select Add Emitter. A new particle emitter is created at the default position.
To create a new particle emitter at the same position as an existing emitter, do the following:
a. Ensure that Fluid Objects is selected for the Selection Filter at the lower right of the graphics window
b. Select a particle emitter in the model. Right-click and select Add Emitter. A new emitter is created at the same position as the selected emitter.
Resizing Particle Emitters
To resize a particle emitter perform the following steps:
1. Ensure that Fluid Objects is selected for the Selection Filter at the lower right of the Graphics window.
2. Click > Particle Options to open the Animation Options dialog box. Ensure that the button is pressed (particle mode) so that you can select particle emitters.
Particle Options to open the Animation Options dialog box. Ensure that the button is pressed (particle mode) so that you can select particle emitters.Ensure that is not pressed, so that the changes you make are only applicable to the selected particle emitters. By default this button is pressed and changes you make are applied to all emitters.
is not pressed, so that the changes you make are only applicable to the selected particle emitters. By default this button is pressed and changes you make are applied to all emitters.3. Click the circle that denotes the particle emitter. Handles appear on the ellipse. You can use these handles to resize the particle emitter.
1. Particle emitter
2. Handles used to resize particle emitter
4. Drag the handles to change the diameter of the emitter. In this example the particle emitter diameter is now larger.

1. Particle emitter resized
To Reposition a Particle Emitter
1. Ensure that Fluid Objects is selected for the Selection Filter at the lower right of the graphics window.
2. Click the sphere that denotes the particle emitter. A dragger appears.

1. Volume enclosure
2. Use dragger to reposition particle emitter
3. Use the dragger to reposition the particle emitters. In this example one particle emitter is moved in the positive Y- direction, and one in the negative Y- direction.

Deleting Particle Emitters
1. To delete a specific particle emitter:
a. Ensure that Fluid Objects is selected for the Selection Filter at the lower right of the graphics window.
b. Select a particle emitter in the model. Right-click and select Delete Emitter to delete the selected emitter.
2. To delete all particle emitters, right-click anywhere in the graphics window and select Delete All Emitters.
To delete all emitters you do not need to select Fluid Objects for the Selection Filter. |