To Redefine a Fitting
Using  in the right-click shortcut menu, you can redefine the point of the fitting and place it, and you can change the orientation of the fitting while inserting it by flipping or twisting it.
in the right-click shortcut menu, you can redefine the point of the fitting and place it, and you can change the orientation of the fitting while inserting it by flipping or twisting it.To Redefine the Point of a Fitting
1. Select a fitting in the Model Tree or graphics window, right-click and click . The REDEF FITT menu appears.
. The REDEF FITT menu appears.2. Click Point. The FITT PNT menu appears.
3. Click Place Point. The Select menu appears.
4. Select a point and click Done.
5. If required, click Align Point to change the alignment of the point.
To Redefine the Orientation of a Fitting
The following images show how the orientation of a fitting is redefined:
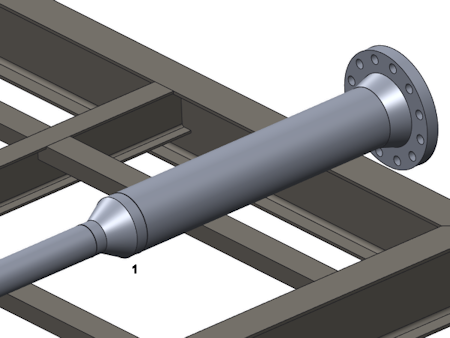 1. Fitting |
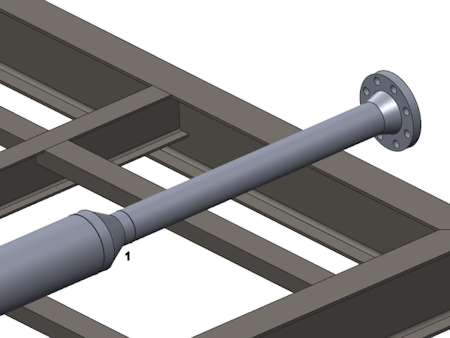 1. Reoriented fitting |
1. Select a fitting to redefine in the Model Tree or graphics window, right-click and click from the shortcut menu. The REDEF FITT menu appears.
from the shortcut menu. The REDEF FITT menu appears.2. Click Orientation. The ORIENT FIT menu appears. To flip the fitting, go to Step 4. To twist it, go to Step 5.
3. Click Flip. The system flips the position of the entry ports.
4. Click Twist and do one or all of the following, as necessary:
◦ Using Set Zero Ref, set an edge or axis as the zero angular reference for the x-axis orientation of the highlighted port.
You cannot twist internally inserted corner fittings.
◦ Using Clear Zero Ref, remove a previously set zero reference by changing the fitting twist to be relative to its current position. The fitting maintains its position, and any twist dimension disappears.
◦ Using Enter Value, specify the rotation of the highlighted port in degrees about the reference-port z-axis. If there is no zero reference, this angle is relative to the current position. If there is a zero reference, the angle is between the zero reference and the x-axis on the highlighted entry port.
◦ Using Align X, align the x-axis of the highlighted entry port to the geometry reference.
◦ Using Align Y, align the y-axis.
The system updates the dimension and changes the position of the fitting accordingly.