To Create a Profile Rib
1. Click Model, click the arrow next to Rib, and click  Profile Rib. The Profile Rib tab opens.
Profile Rib. The Profile Rib tab opens.You could also select a sketch first, or select a datum plane or planar surface first, and then enter the rib tool. |
2. To select the body to which the rib geometry is added, click the Body Options tab, click the body collector, and then select the body.
3. To define the sketch for the rib, perform either of these actions:
◦ Sketch a section to the silhouette of the parent geometry. This new independent sketch is internal to the profile rib feature:
1. Click the References tab.
2. Click Define. The Sketch dialog box opens.
You can also select Section from the shortcut menu. |
3. Select a datum plane or planar surface for the sketching plane, and click Sketch in the Sketch dialog box. The Sketch tab opens.
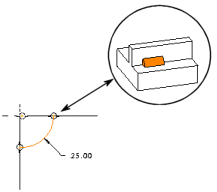
4. Sketch the profile section, with these requirements:
▪ Single open loop
▪ Contiguous
▪ Does not intersect itself
▪ Line ends attach to surfaces, making an area to fill. The sketch together with the surfaces of the selected body form a closed area
▪ For rotational ribs, the sketch must be created on a plane that passes through the axis of revolution of the revolved surface
▪ The area of the rib, as defined by the sketch and the surfaces that the sketch ends attach to, must all be located in one body
5. Click  OK. The Sketch tab closes. The Profile Rib tab resumes.
OK. The Sketch tab closes. The Profile Rib tab resumes.◦ Select a sketch in the Model Tree. This section is dependent on the parent sketch. You can break the association by clicking Unlink. This makes a copy of the parent sketch as an internal sketch in the rib feature.
The sketch must meet the requirements mentioned above.
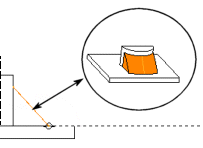
Preview geometry appears in the graphics window. A direction arrow indicates the side of the sketch on which the geometry is created.
4. Optionally, to flip the depth direction of the geometry to the other side of the sketch so that it fills an enclosed area, perform any of these actions:
◦ On the Profile Rib tab, under Depth, click  Flip Direction.
Flip Direction.◦ Click the direction arrow
◦ On the References tab, click Flip
◦ Right-click the direction arrow, and select Flip
In this case, the arrow direction must point toward the parent feature, so the rib can fill an enclosed area and create geometry:
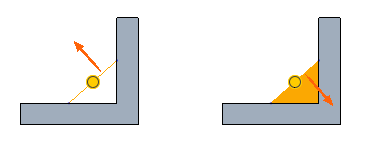
In this case, you can choose either direction because both options fill an enclosed area:
5. To define the width of the rib, perform any of these actions:
◦ Type a value in the  width box on the Profile Rib tab
width box on the Profile Rib tab◦ Type a value in the dimension box in the graphics window
◦ Drag the handle to the desired distance
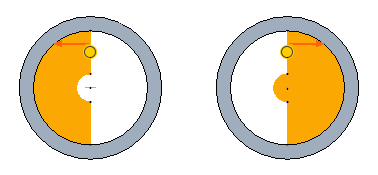
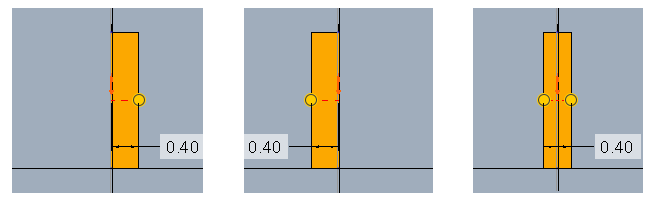
6. Optionally, to switch the geometry of the rib in relation to the sketching plane, perform any of these actions:
◦ Click  on the Profile Rib tab. Each click cycles the geometry from one side of the sketching plane, to the other side, and then symmetric about the sketching plane.
on the Profile Rib tab. Each click cycles the geometry from one side of the sketching plane, to the other side, and then symmetric about the sketching plane.◦ Right-click the graphics window and select Toggle Material Side to cycle from one side of the sketching plane, to the other side, and then symmetric about the sketching plane.
7. Click  OK.
OK.
OK.