About Appearance Preview and Properties
Appearances simulate the look and feel of the model and the way it reacts to light. Appearance properties include color, ambience, shine, intensity, reflectivity, transparency, appearance maps, and so on.
You can preview, create, and modify material properties of appearances in the Appearances Manager, Appearance Editor and the Model Appearance Editor.
Preview Appearance
Click  Preview Appearance. The following elements display:
Preview Appearance. The following elements display:• The appearance sphere that displays the current material properties.
• Keyword—Displays the keywords for the selected appearance. The appearance filter uses these keywords when searching for appearances.
• Description—Displays the description of the selected appearance. The appearance filter does not use this description when searching for appearances.
Except for the default appearance, the name, keywords, and the description of the appearance can be modified. |
Appearance Properties
You can define the appearance properties on the following tabs:
• The Properties tab has the appearance Class, which lists the different classes of the appearances, and the Sub Class which lists the types of the material in the selected class. The class determines the shader types that are available. You can define color and highlight color properties for each class.
• The Texture, Bump, and Decal tabs allow you to define and assign the material map.
The sphere in the preview container displays the changes as you apply the properties. |
Appearance Classes
When you choose the class of an appearance, you are specifying the most important factor in the material definition. This factor determines how realistic the applied material appears.
Each class is tailored to a different rendering type.
Appearances that require Keyshot license or Shading with Reflections enabled are displayed with a blue triangle (  ) in the lower right corner of the appearance thumbnail. ) in the lower right corner of the appearance thumbnail. |
Class Properties
The appearances are categorized under Class and Sub Class. Depending on the Class and Sub Class of the appearances, you can set the properties of the class and sub class to edit the appearances of the model. Use the following options to define the properties of the selected material:
• Ambient—Adjust the sliders or enter values in the adjacent box to adjust the ambient properties for the light. Ambient controls the amount of ambient light reflected by the surface.
• Color—Click the swatch to define a color for the model. Use the Color Editor to define the color.
• Diffuse—Adjust the slider or enter values in the adjacent box. Diffuse controls the amount of light that reflects from the surface of the model.
• Glossiness—Adjust the slider or enter values in the adjacent box to determine the glossiness of the model surface.
• Highlight—Adjust the sliders or enter values in the adjacent box to adjust the highlight properties.
• Intensity—Adjust the slider or enter values in the adjacent boxes to determine the intensity of the light.
• Shine—Adjust the sliders or enter values in the adjacent box to control the shine parameters. Shine controls the shine of the surface. The shinier the surface, the smaller the highlight.
• Reflection—Adjust the sliders or enter values in the adjacent box to adjust the reflectance.
• Reflections—Click the Reflections check box to allow reflections in the appearance.
• Reflection Color—Click the swatch to define the reflection color for the model. Use the Color Editor to define the Reflection Color.
• Reflectivity—Adjust the slider or enter values in the adjacent box to determine the reflectance properties of the model.
• Refraction Index—Adjust the slider or enter values in the adjacent box to determine how much the light bends when it passes through the surface of the model.
• Shadows—Click the Shadows check box to allow shadows in the appearance.
• Translucency—Adjust the slider or enter values in the adjacent box to determine how much the light passes through the surface of the model.
• Transparency—Adjust the slider or enter values in the adjacent box to control the degree of transparency.
Paint Properties
If you set the Class type to Paint and the Sub Class type to Metallic, you can set the following additional properties:
• Base Color—Click the swatch to define the base color. Base Color is the base diffuse color of the material.
• Edge Color—Click the swatch to define the edge color. Edge Color is the color that is seen at the glancing angles or edges of the materials. This color appears to be darker than the color on the surfaces of the material.
• Flake Color—Click the swatch to define the flake color. Flake Color is the color of the flakes, which is usually white. It also determines the reflectivity of the flakes.
• Edge Bias—Adjust the slider or enter values in the adjacent box to determine the edge bias for the painted surface. Edge Bias defines the falloff rate of the color towards the edges of the material. Edge Bias ranges from 0.0 to 10.0, where the value 0.0 turns the effect off. Higher values makes the edge region narrower, lower values makes it wider.
• Scale—Adjust the slider or enter values in the adjacent box to adjust the scale.
Wood Properties
In the Wood class, you can select a type of procedural wood from the Type box. With the type set to None, you can apply a texture map for the wood class appearance.
The Wood class has sub classes Rough and Varnished. The options Diffuse and Specularity for the Rough sub class and the options Diffuse, Reflectivity and Glossiness for the Varnished sub class determine the illumination properties of the appearance.
If you set the type of Wood to Ash, Beech, or Birch, you can set the following additional properties:
• Base—Click the swatch to define the base color of the wood. Use the Color Editor to define the color.
• Second—Click the swatch to define the second color of the wood. Use the Color Editor to define the color.
• Ring—Click the swatch to define the ring or edge color of the wood. Use the Color Editor to define the color.
• Axis—Select the rotation axis of the appearance from the list. The default rotation axis is X Axis.
• Rotation—Adjust the slider or enter values in the adjacent box ranging from 0 to 359 to rotate the appearance. The default value is 0.
• Scale—Adjust the slider or enter values in the adjacent box to scale the appearance. The default value is 3.
Emissive Appearances
Models with emissive appearance emit light. You can select emission color and adjust its intensity. The following image shows a rendered model with emissive lighting:
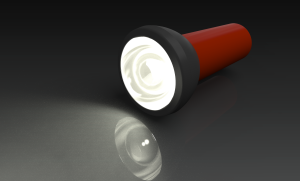
You can render the emissive lighting effect on the Render Studio tab. You cannot see this effect with regular Creo graphics. |