Exercise 7– Integrating Legacy Screw Fasteners into the IFX Library
1. Using Windows Explorer, confirm that you have Write permissions for the configuration folder by following the steps listed below:
a. From the <creo_loadpoint>, click > . The ifx folder opens.
b. Right-click the configuration folder and select Properties.
c. On the Security tab, confirm that you have Write permission for the configuration folder. If you do not have Write permission add it or speak to your administrator.
2. Using Windows Explorer, create the folder, IFX_custom_lib. You can create the folder anywhere as long as you have Write permission to the folder. IFX_custom_lib is the new custom library.
3. From the <creo_loadpoint>, click > > . The parts folder opens.
4. From parts, copy the ifx_catalogs and ifx_fastener_data folders and all its subfolders to IFX_custom_lib.
5. Start Creo Parametric.
6. Click > > and set the configuration option, show_selected_item_id to yes. Click OK.
7. Set the working directory to <downloaded files location>\IFXTraining\Migration_asm.
8. Open ifx_migration.asm. You must have an assembly open before you can access the Creo Intelligent Fastener functionality.
9. In Creo Parametric, click > >  Options. The Intelligent Fastener Options dialog box opens.
Options. The Intelligent Fastener Options dialog box opens.10. Select the General option PATH_ABS_LIBRARY, click Browse, and then browse to IFX_custom_lib and click, Open. The path appears in the Value box. Click OK.
11. In Windows Explorer, browse to IFX_custom_lib and create the folder, myfasteners.
12. In Creo Parametric, click > > and set the configuration option, search_path, to point to your myfasteners folder by typing the full path name or by using Browse. Click OK.
13. In Windows Explorer, browse to <downloaded files location>\IFXTraining\Legacy_Part and copy m6x60-din931.prt, m6x70-din931.prt, and m6x75-din931.prt to the new custom folder myfasteners.
14. In Windows Explorer browse to IFX_custom_lib\ifx_catalogs and create a new Fastener Instance Catalog File myfasteners.txt
15. Edit the myfasteners.txt file to match the file below:
#screws |
legacy_fasteners |
16. Save and close myfasteners.txt.
17. From the IFX_custom_lib\ifx_fastener_data folder, copy iso4017–8_8.dat and rename it to legacy_fasteners.dat
18. Edit legacy_fasteners.dat to match the file below:
!----------------------------------------------------------------------! ISO 4017 - 8.8!! Hexagon head screw, fully threaded, product grades A and B! Sechskantschraube mit Gewinde bis Kopf, Produktklassen A und B!---------------------------------------------------------------------- | |||||||
SCREWTYPE | 21 | ||||||
UNIT | MM | ||||||
SURFACE | 126 | ||||||
AXIS | 85 | ||||||
CBSCR | DIN974-2 R1 | ||||||
INFO | ISO 4017 - 8.8 | ||||||
SYMBOL | STRING | DN | LG | S | K | DG | P |
INSTANCE | STRING | DN | LG | S | K | DG | P |
m6x60-din931 | M6 | 6 | 60 | 10 | 4 | 5 | 1 |
m6x70-din931 | M6 | 6 | 70 | 10 | 4 | 5 | 1 |
m6x75-din931 | M6 | 6 | 75 | 10 | 4 | 5 | 1 |
You must press TAB to separate the values in the DAT file. |
19. Save legacy_fasteners.dat but do not close it.
20. The legacy_fasteners.dat file requires the surface ID and axis ID of the fasteners. Perform the following steps to identify the IDs:
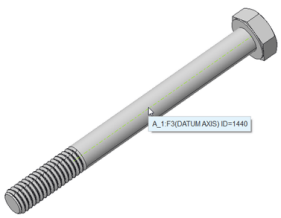
a. In Creo Parametric open m6x60-din931.prt.
b. In the graphics window, move the pointer over the axis and note the ID 1440.
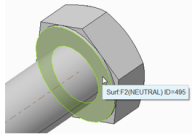
c. Similarly, move the pointer over the fastener head and note the ID 495.
d. Open m6x70-din931.prt and m6x75-din931.prt and obtain their surface and axis IDs.
21. Type the unique surface IDs and axis IDs in legacy_fasteners.dat.
SURFACE | 495 | 495 |
AXIS | 1440 | 1444 |
22. In Windows Explorer, from the <creo loadpoint> click > > .
23. In the Configuration folder, open ifx_screw_data.cfg. Review the section Diameters of couterbores to validate if the CBSCR is suitable for M6 fasteners. Close the file.
24. In legacy_fastners.dat, change the name INFO from ISO 4017 - 8.8 to New Legacy Fasteners. Your file should match the file below:
!----------------------------------------------------------------------! ISO 4017 - 8.8!! Hexagon head screw, fully threaded, product grades A and B! Sechskantschraube mit Gewinde bis Kopf, Produktklassen A und B!---------------------------------------------------------------------- | |||||||
SCREWTYPE | 21 | ||||||
UNIT | MM | ||||||
SURFACE | 495 | 495 | |||||
AXIS | 1440 | 1444 | |||||
CBSCR | DIN974-2 R1 | ||||||
INFO | New Legacy Fasteners | ||||||
SYMBOL | STRING | DN | LG | S | K | DG | P |
INSTANCE | STRING | DN | LG | S | K | DG | P |
m6x60-din931 | M6 | 6 | 60 | 10 | 4 | 5 | 1 |
m6x70-din931 | M6 | 6 | 70 | 10 | 4 | 5 | 1 |
m6x75-din931 | M6 | 6 | 75 | 10 | 4 | 5 | 1 |
25. Save and close legacy_fasteners.dat.
26. In Windows Explorer browse to IFX_custom_lib\ifx_catalogs, open ifx_catalogs.txt and add myfasteners to the #screws section of the file. Your file should match the file below:
#screws |
myfasteners |
mm |
mm-HV |
mm-Fine |
inch |
inch-structural |
ANSI-ENGLISH |
ANSI-METRIC |
ISO |
JIS |
HoloKrome |
#pins |
mm |
inch |
ISO |
JIS |
HoloKrome |
27. Save and close ifx_catalogs.txt .
28. In Windows Explorer, from the <creo loadpoint> click > > > .
29. In the usascii folder, open the library translation fileifx_translation.txt and add the following help text to the file.
myfasteners.Label |
My Fasteners |
My Fasteners |
myfasteners.HelpText |
My Fasteners Library |
My Fasteners Library |
legacy_fasteners.HelpText |
Converted Legacy Fasteners |
Converted Legacy Fasteners |
30. Save and close ifx_translation.txt .
31. Restart Creo Parametric.
32. Set the working directory to <downloaded files location>\IFXTraining\Migration_Asm.
33. Open ifx_migration.asm.
34. Using Creo Intelligent Fastener, select the references to place a new fastener. When the Screw Fastener Definition dialog opens, note the following changes:
◦ My Fasteners is available in the Catalog list and the tooltip is My Fasteners Library.
◦ New Legacy Fasteners is available in the Screw list and the tooltip is Converted Legacy Fasteners.
◦ The Thread diameter M6 is available with the lngth values 60, 70 and 75.
35. Complete the placement of the fastener, and close the assembly without saving.
36. Click > > . The Erase Not Displayed dialog box opens.
37. Click OK to erase all files from memory.