Removing Material
Remove material by using the  Remove Material option on the
  Extrude tab.
Remove Material option on the Extrude tab.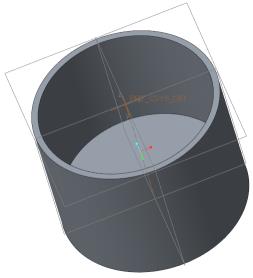
1. To specify the sketch plane, in the Model Tree, select the datum plane TOP.
2. On the Model tab, click Extrude from the Shapes group. The Extrude and Sketch tabs open.
Extrude from the Shapes group. The Extrude and Sketch tabs open.3. To display sketch dimensions, on the in-graphics toolbar of the Sketch tab, click  Sketcher Display Filters, and select the
  Dimensions Display check box.
Sketcher Display Filters, and select the Dimensions Display check box.4. To orient the sketch plane parallel to the screen, click  Sketch View on the in-graphics toolbar.
Sketch View on the in-graphics toolbar.5. To sketch a circle:
a. On the Sketch tab, click  Center and Point in the Sketching group.
Center and Point in the Sketching group.b. To specify the center of the circle, click the pointer over the intersection of the dashed lines.
c. To specify the diameter of the circle, drag the pointer away from the center and click. It does not matter how far you drag the pointer.
d. To exit the sketch Center and Point tool, middle-click two times. The diameter dimension appears.
Center and Point tool, middle-click two times. The diameter dimension appears.6. To edit the circle diameter, double-click the diameter dimension, edit the value to 75.5, and press ENTER.
7. To complete the sketch, on the Sketch tab, click  OK. The Sketch tab closes.
OK. The Sketch tab closes.8. On the Extrude tab, make sure that Remove Material is selected.
Remove Material is selected.9. Double-click the depth dimension, edit the value to 51.5, and press ENTER.
10. On the Extrude tab, click  .
.
.11. Rotate the model to see the removed material.