To Define a Motor
You can use the buttons, collectors, and lists in the Motor tab to define a motor. The procedures below use the References and Profile Details tabs to set the references and characteristics for your motor.
1. To create a Servo motor, in the Mechanism tab, click  Servo Motors. The Motor tab opens.
Servo Motors. The Motor tab opens.2. To create a Force motor, in the Mechanism tab, click  Force Motors. The Motor tab opens.
Force Motors. The Motor tab opens.You can switch between a servo, a force motor, a force or a torque when you have a Mechanism Dynamics license. Remember that servo motors and force motors have different reference collection rules. |
3. Select references for the motor.
4. To set the physical quantity drive by the motor, choose an option from the Driven Quantity list or use the Profile Details tab Driven Quantity.
6. View the motor profile in a graph.
7. Click  .
.
.Selecting References
1. Click References. The References tab opens.
2. Select references for a servo motor, the type of reference you choose in most instances will set the motion type. Choose one of the following reference types:
◦ Select a motion axis. Depending on the motion axis selected, you can create a  translational,
  rotational, or
  slot motor.
rotational, or slot motor.1. To edit motion axis settings, click  .
.
.2. The Motion Type is determined by the Driven Entity reference selected.
3. To flip the direction of motion, click Flip.
◦ Select 2 references for a servo motor. Depending on the references selected, you can create a translational or rotational motor.
When you select references that are a point or a plane to define the servo motor, you are creating a geometric servo motor. |
1. Select a point or a plane as the Driven Entity.
2. Select a point or a plane as the Reference Entity.
3. The Motion Type is in most cases automatically determined by the Driven Entity reference selected. To change the Motion Type, select a different option. Only applicable options are available.
4. When applicable, select a reference that is either a straight line-based curve, an edge, or an axis for the Motion Direction. You can also select a plane as the motion direction, the normal of the plane is used to define the direction. An arrow appears to show the direction of motion.
5. To flip the direction of motion, click Flip.
◦ Select references for a Force Motor, Force, or Torque
▪ A motion axis Force Motor and a point-to-point Force applies a force in a single degree of freedom (along a translational, rotational, or slot axis). When you define this type of Force Motor or Force, you select only a Driven Entity reference.
▪ A single-point Force, and a Torque applies motion in a specified direction. When you define this type of Force Motor, Force, or Torque, set Motion Direction options.
1. Select the type of motion direction from the following options:
▪ Explicit Vector—Select a Reference Frame for the vector. Leave the box empty to use the world coordinate system. Enter explicit X, Y, and Z values.
▪ Straight Line or Plane Normal—Select a motion reference. Click Flip to reverse the direction of the force or the torque.
▪ Point-to-Point—Select 2 points to specify the direction.
2. Select either Ground or Driven Rigid Body from the Direction is Relative to area.
Setting the Driven Quantity
1. Click Profile Details to open the tab.
2. Select a Driven Quantity from the list. The default is Position.
◦ Position—Defines the servo motor motion in terms of the position of the selected entity.
◦ Velocity—Defines the servo motor motion in terms of its velocity. By default, the current position of the servo motor is used when motion begins.
1. To set a different starting point, clear the Use Current Position as Initial check box.
2. Select a value from the Initial Position list, or type a value in the box.
3. To view the new initial position, click  . The position updates in the graphics window.
. The position updates in the graphics window.4. To change the units, select an option from the list.
◦ Acceleration—Defines the servo motor motion in terms of its acceleration. By default, the current position of the servo motor is used when motion begins.
1. To set a different starting point, clear the Use Current Position as Initial check box.
2. Select a value from the Initial Position list, or type a value in the box.
3. To view the new initial position, click . The position updates in the graphics window.
. The position updates in the graphics window.4. To set an Initial Velocity, select a value from the list, or type a value in the box.
5. To change the initial position or initial velocity units, select an option from the applicable list.
◦ Force—Defines a Force Motor, a Force, or a Torque. A Force Motor can drive a motion axis, a single datum point or vertex, a pair of datum points/vertices, or a whole rigid body.
Setting the Motor Function
1. Click Profile Details to open the tab and select the driven quantity.
2. To define the motion of the motor, select a Function Type from the list.
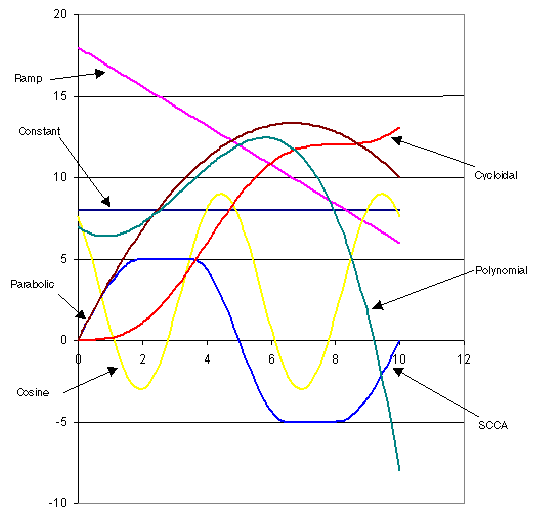
Function Type | Description | Coefficients |
|---|---|---|
Constant | Creates a constant profile. | q= A where A = Constant |
Ramp | Creates a profile that changes linearly over time. | q= A + B*x where A = Constant B = Slope |
Cosine | Assigns a cosine wave value to the motor profile. | q= A*cos(360*x/T + B) + C where A = Amplitude B = Phase C = Offset T = Period |
Sine-Constant-Cosine-Acceleration (SCCA) | Simulates a cam profile output. This option is available for acceleration motors only. | For more information, see About Settings for SCCA Motor Functions. |
Cycloidal | Simulates a cam profile output. | q = L*x /T - L*sin(360*x/T)/(2*pi) where L = Total rise T = Period |
Parabolic | Simulates a trajectory for a motor. | q = A*x + 1/2 B(x2) where A = Linear coefficient B = Quadratic coefficient |
Polynomial | Defines third degree polynomial motor profiles. | q = A + B*x + C*x2+ D*x3 where A = Constant term coefficient B = Linear term coefficient C = Quadratic term coefficient D = Cubic term coefficient |
Table | Generates the motor motion with values from a four-column table. You can use a table of output measure results. | For more information, see To Define a Table Motor Function. |
User defined | Specifies any kind of complex profile defined by multiple expression segments. | For more information, see To Define a User-Defined Motor Function. |
Custom load | Applies a complex, externally-defined set of loads to your model. This option is only available for the force motor definition. | For more information, see About Custom Loads. |
3. For a Force motor, set the Primary Variable, the variable represented by x in the function defining magnitude. You can select, t (time) or any measure available in the list.
4. Set the coefficients for the selected type of motor function when applicable.
Setting the Graph Display
Use the Graph section to show a motor profile in the Chart-Tool window.
1. To display each graph in a separate window, click to select the In separate graphs check box.
2. Click or clear a check box to apply or remove the different graph display settings.
3. When you define a table profile, you can modify settings related to the display and number of interpolated points.
4. Click  to open the Chart-Tool window.
to open the Chart-Tool window.5. To change the graph display, leave the Chart-Tool dialog box open and redefine motor functions. The graph automatically updates. When you see the profile you are interested in, close the Chart-Tool dialog box and accept the motor definition.
The following graph depicts the motor functions for different types of motion created by a motor. The formula values used to generate the motor functions follow:
Constant | Ramp | Cosine | Cycloidal | SCCA | Parabolic | Polynomial |
A = 8 | A = 18 | A = 6 | L = 12 | 0.4 | A = 4 | A = 7 |
B = –1.2 | B = 40 | T = 8 | 0.3 | B = –0.6 | B = –1.5 | |
C = 3 | 5 | C = 1 | ||||
T = 5 | 10 | D = –0.1 |
Changing Properties
To change motor feature properties, use the Properties tab.
1. To edit the motor feature name, type a new one in the Name box.
2. To display information on the motor feature in the browser, click  .
.
.