To Use the Creo ModelCHECK Report
1. The ModelCheck report shows the following details:
◦ Model name at the top and the status and total number of errors and warnings. An asterisk next to the model name identifies a changed model. The asterisk disappears when the model is saved, or reopened after erasing the model from the session.
◦  —Returns to the original model for which you have run the report. The icon and the arrow keys to move to the previous or the next report are available only for assemblies and drawings.
—Returns to the original model for which you have run the report. The icon and the arrow keys to move to the previous or the next report are available only for assemblies and drawings.◦  —Reruns ModelCHECK in the previous mode.
—Reruns ModelCHECK in the previous mode.2. The report displays the navigation pane depending on the type of model for which you have run the report. The navigation pane includes sections of the report according to the classification of the model checks. The Overview section displays the following details of the report:
◦ Model name
◦ The date of the report
◦ The operating mode
◦ The configuration files used
◦ The name of the user who ran the ModelCHECK
◦ The name of the user who last saved the model
◦ The date of creation of the model
3. The ModelCHECK report for an assembly lists the failed checks for the entire assembly and provides links to the individual reports of each component of the assembly in the Assembly models section. When you a run a report for a drawing, the drawing models report is available in the Drawing models section.
4. The following options are available in the various sections of the report:
◦ Category — Allows you to filter the report by the categories of checks. The Configuration Settings option in the ModelCHECK Configuration Tool on the Creo Parametric Options dialog box control the categories available on this menu.
◦ Type — Allows you to filter options by type. Click the check boxes adjacent to the options to refine the display of the checks:
▪ Click the  check box to show the failed checks that are configured as errors.
▪ Click the  check box to show the failed checks that are configured as warnings.
▪ Click the  check box to show the checks that are successful.
Only errors and warnings are shown by default. A number adjacent to each check box indicates the instances of each type of check. |
5. To access the online help for a check, click ,  , , or that is available to the left of the name of each check in the report. A page with information specific to the check appears at the bottom of Creo ModelCheck Report.
To access the customized ModelCHECK Help, do the following:
b. Open Creo Parametric again.
c. Run ModelCHECK and click the icon next to a check. The customized ModelCHECK Help page appears. If the customized Help page is not found in the custom folder, a message appears that the page cannot be displayed.
d. To return to the online Help, click  . When the online Help appears, the icon disappears.
. When the online Help appears, the icon disappears.6. Click the name of a check in the report to view its details and instances. For example, when you click the feature id, the corresponding feature is highlighted on the model.
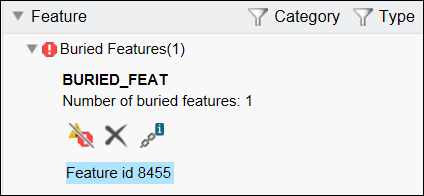
From the report, you can perform the following actions on the model:
◦ Highlight a feature
◦ Ignore a problem
◦ Delete a feature
◦ View references
All updated checks appear with a  . When the Updated check box is selected as a filter type, then the number of updates appears next to the Updated check box.
. When the Updated check box is selected as a filter type, then the number of updates appears next to the Updated check box.The actions vary for different checks. |
7. The last section is Information. It shows the information-only checks.