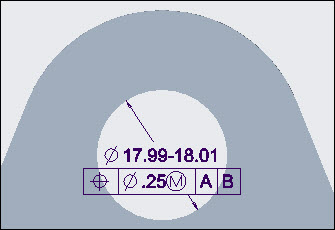
Example: Creating a Position GTOL
Use the characteristics and values given in the following table to create a sample geometric tolerance.
|
Characteristic
|
Value
|
|---|---|
|
Entity
|
Hole
|
|
Tolerance Location
|
As part of a diameter dimension
|
|
Characteristics Type
|
Location/Position (a true position tolerance)
|
|
Tolerance Value
|
0.25
|
|
Material Condition
|
MMC  |
|
Primary Datum Material Condition
|
(A) Add Symbol
|
|
Secondary Datum Material Condition
|
(B) Add Symbol
|
1. Click > .
2. Select the dimension of the hole. Click gtol and place the pointer on the dimension. The dimension text color changes. The GTOL appears below the dimension. After the placement, the Geometric Tolerance ribbon tab opens.
3. Click the Geometric Characteristic list and select Position .
.
 .
.4. Click the tolerance text box, from the Symbols group, select the diameter symbol. The diameter symbol is reflected in the tolerance text box.
5. In the tolerance text box, add tolerance as 0.25 after the diameter symbol.
6. From the Symbols group, select the  symbol. The symbol is reflected in the tolerance text box after the 0.25 value.
 symbol. The symbol is reflected in the tolerance text box after the 0.25 value.
7. Add the primary datum reference as A and secondary reference as B.
The GTOL appears as shown:

 Geometric Tolerance