Linear and Non-linear Cross-Hatch Patterns
Creo Parametric supports two types of crosshatch pattern files: XCH files and PAT files.
The System Patterns directory contains the PAT files by default. You can also store the XCH and PAT files in the current working directory or the User Patterns directory specified by the configuration option pro_crosshatch_dir and use them in the models and drawings.
You can set the default crosshatch pattern file type as pat or xch using the configuration option default_hatch_type.
Difference between the XCH and PAT files
|
XCH files
|
PAT files
|
|---|---|
|
XCH files are Creo-specific pattern files.
|
PAT files are universal ASCII-based pattern files.
|
|
XCH files support only linear hatching patterns.
|
PAT files support linear and non-linear hatching patterns.
|
|
You can create the XCH files using Creo Hatch Editor.
|
You can download the PAT files from the Internet, edit an existing PAT file using a text editor, such as Notepad, save the changes to a new file, or create a new PAT file.
|
|
You can edit the properties of XCH hatch patterns using Creo Parametric, individually or as a whole.
While editing, you can control the spacing, angle, offset, or line style of the hatching. You can also modify the color of a filled area or a surface or modify the lines in the pattern.
|
You can edit the properties of PAT hatch patterns using Creo Parametric, only as a whole entity.
While editing, you can control the color or scale of the hatching. You can also rotate the whole pattern by an offset angle.
|
|
In 3D models, the XCH hatch patterns are relative to the application screen. If the part is rotated, the patterns remain stationary.
|
In 3D models, the PAT hatch patterns are projected onto the surfaces. If the part is rotated, the patterns move with the part.
|
PAT File Structure
The PAT file includes linear and non-linear hatch patterns. Each hatch pattern begins with an asterisk character (‘*’) which indicates a new pattern. The basic structure of a hatch pattern is as follows: *pattern-name, standard-name, description
• The asterisk character is followed by a series of strings separated by commas (‘,’). The first string provides the pattern’s name.
• The second string provides the name of the pattern’s standard.
• The third string provides the description of the pattern.
• Any other string added and separated by a comma is considered part of the description.
|
|
• If only a description exists it is referred to as both the group’s name and description, for example, *ANSI32, Steel
• If the group’s name is empty, it is considered as a part of the miscellaneous group patterns, for example, *ANSI32
• If the group’s name and description are missing the pattern is added to the miscellaneous group patterns
|
For example, *ANSI131, ANSI, ANSI Iron, Brick, Stone masonry
In the above example:
• ANSI131 is the pattern name
• ANSI is the standard name
• ANSI Iron, Brick, Stone masonry is the description
The following line consists of a series of numeric values separated by commas. These values define the hatching lines of the pattern as follows: angle, x-origin, y-origin, delta-x, delta-y, dash-1, dash-2, dash-3, dash-4…
• Each pattern line is considered to be the first member of a line family, created by applying the delta offsets in both directions to generate an infinite family of parallel line.
• The angle is defined as the measured angle between the x-axis and the line (in a counter clockwise measuring method).

• The x-origin and y-origin are the drawing origin of the family of hatch lines.

• The delta-x value indicates the displacement between members of the family in the direction of the line. It is used only for dashed lines.
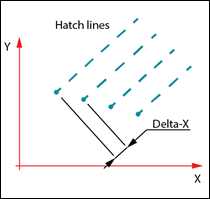
• The delta-y value indicates the spacing between members of the family and is measured perpendicular to the lines.

• A line is considered to be of infinite length. A dash pattern is superimposed on the line.
• The x and y line spacing values are followed by a series of values that represent the line type definition:
◦ A positive value specifies a dash
◦ A negative value defines a space
◦ A zero value specified a dot
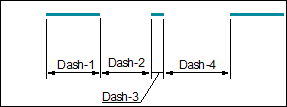
• Any non-empty line starting with a semicolon (‘;’) is considered as a comment
Example: Crosshatch Pattern with Dashes and Dots
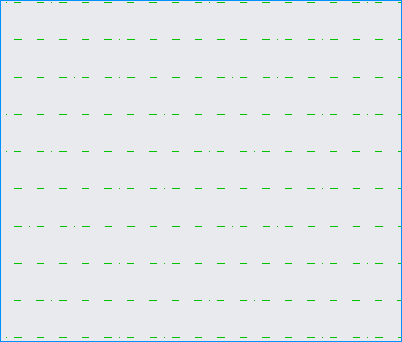
The dashes and dots crosshatch pattern is defined as follows:
*Pattern1, My Category, Dashes with dots
0, 0,0, 0,0.5, 0.1,-0.1,0,-0.1
0, 0,0, 0,0.5, 0.1,-0.1,0,-0.1
The header row begins with an asterisk character (*) and where:
• Pattern1 is the pattern name.
• My Category is the category name.
• Dashes with dots is the description of the pattern.
The second row defines the crosshatch pattern, where:
• 0 is the angle that indicates horizontal lines.
• 0,0 defines the drawing origin of the first line of the family.
• 0,0.5 defines the displacement between members of the family in the direction of the line (delta-x) and the spacing between them in the perpendicular direction (delta-y), respectively.
• 0.1,-0.1,0,-0.1 defines the hatch pattern where a dash (0.1), a space (-0.1), a dot (0), and a space (-0.1) are placed one after the other.
Example: Checkered Crosshatch Pattern
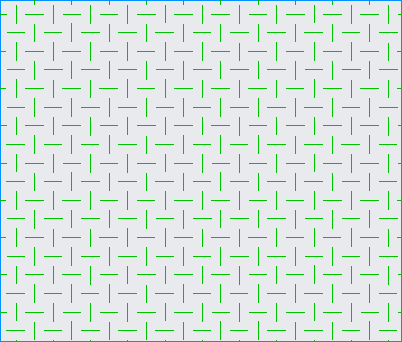
The checkered pattern is defined as follows:
*Pattern2, My Category, Checkered
0, 0,0.09375, 0.25,0.25, 0.25,-0.25
90, 0.125,0.21875, 0.25,0.25, 0.25,-0.25
0, 0,0.09375, 0.25,0.25, 0.25,-0.25
90, 0.125,0.21875, 0.25,0.25, 0.25,-0.25
The header row begins with an asterisk character (*) and where:
• Pattern2 is the pattern name.
• My Category is the category name.
• Checkered is the description of the pattern.
The second row defines the crosshatch pattern, where:
• 0 is the angle of the hatch lines that indicates horizontal lines.
• 0,0.09375 defines the drawing origin of the first line of the family.
• 0.25,0.25 defines the displacement between members of the family in the direction of the line (delta-x) and the spacing between them in the perpendicular direction (delta-y), respectively.
• 0.25,-0.25 defines the hatch pattern where a dash and a space of equal lengths are placed one after the other.
The third row defines the vertical lines in the same manner, where 90 is the angle of hatch lines:
90, 0.125,0.21875, 0.25,0.25, 0.25,-0.25
Configuration Options
The configuration option pro_crosshatch_dir specifies a default directory for your crosshatch library in which you can save crosshatch patterns for later retrieval.
The configuration option default_hatch_type sets the default crosshatch pattern file type, PAT or XCH, to be used in models and drawings.
The configuration option hatch_pattern_cfg_file specifies the hatch pattern configuration (*.cfg) file to be loaded when Creo Parametric is started.
Handling Same Name Files
The system handles pat files with the same name when placed in different directories. The hatch pattern data in the files is handled and added as any other data to the general hatch pattern data pool.
Handling Data Duplication
When the hatch pattern data is exactly the same as another pattern data in the same PAT or other PAT files, the system compares the pattern data and decides how to add the hatch pattern data to the general pool of data.
• When the pattern data that is exactly the same in all aspects such as name, standard name, description, and pattern values as another pattern data, it is skipped and not added.
• If hatching patterns with the same name and standard name but a different set of line pattern definitions are encountered, all these patterns are added to the hatch pattern data pool. These patterns are distinguished by an added postfix in the form of an underscore and index number (‘_#’ ) which is added to the name of the hatch patterns. The example is as follows:
*ANSI32, ANSI, Steel
45, 0, 0, 0, 9.525
45, 4.49013, 0, 0, 9.525
And
*ANSI32, ANSI, Steel
60, 0, 0, 0,9.525
60, 0, 0, 0, 9.525
In the above example the first ANSI hatching pattern name is ANSI32 and the second ANSI32_1.
• If all the hatching data is exactly the same apart from the description, the first such hatching pattern is added and the rest is discarded.
Retrieving Hatch Patterns
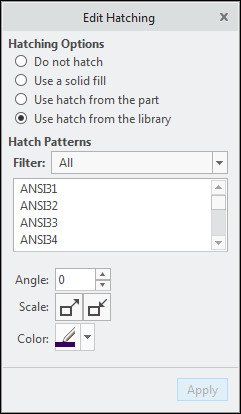
You can retrieve hatch patterns from the Edit Hatching dialog box. This dialog box displays the PAT and XCH hatch patterns in the current working directory, the directory specified using the pro_crosshatch_dir configuration option, and the system directory. It also displays the hatch patterns in the subdirectories of the current working directory. You can filter these hatch patterns by selecting the appropriate option from the Hatch Patterns list box.
Updating and Saving the Hatch Pattern Scale
The following commands are available for updating the scaling factors from a *.cfg file or to save the hatch scaling factors to a *.cfg file.
• Open scale settings — Reads the scale setting from a *.cfg file. When you click this command, the Open dialog box appears, which displays the most recently used files. If the scale file that was opened does not contain all of the displayed hatch patterns then their scaling factor remains as displayed in the hatching gallery.
• Save scale settings — Writes all the scale hatch pattern settings in the gallery to a *.cfg file. When you click this command, the Open dialog box appears, which enables browsing and selecting a location to save the *.cfg file.
To open the Open scale settings and Save scale settings commands, right-click the hatch pattern on the Edit Hatching dialog box.
Scaling the Hatch Pattern Thumbnails
When you move the pointer over a hatch pattern in the list, a thumbnail is displayed. To scale this thumbnail, right-click the hatch pattern in the list and select Thumbnail Scale Up or Thumbnail Scale Down.
You can scale the thumbnail images for PAT hatch patterns only. |