To Connect a Sensor to a ThingWorx Server
To connect your model to the ThingWorx server, you must have a model in ThingWorx that corresponds to a model in Creo Parametric.
Follow the steps below:
Configuring Creo Parametric for ThingWorx
1. Set the configuration option thingworx_connector_config_file to the exact path of your ThingWorxconfiguration properties file (config.properties).
2. Confirm that you installed the JRE when you installed Creo Parametric or set the jlink_java_command configuration options as required.
Settings for the ThingWorx Server
Before you begin, note the following:
• ThingWorx Server changed the way it authenticates using AppKey in URL. https://community.thingworx.com/community/developers/blog/2017/06/08/new-technical-changes-in-thingworx-800.
• By default, new installations of ThingWorx from 8.0.0 have the Allow Application Key as URL Parameter option disabled.
• The Allow Application Key as URL Parameter option can be enabled or disabled on the ThingWorx PlatformSubsystem’s configuration page. To access the configuration page, click > > > .
Configuring ThingWorx
Creo Product Insight 7.0.5 connects to ThingWorx 9.1.1. ThingWorx, ThingWorx Analytics, and Creo Product Insight for ThingWorx Extension need to be the same version. See the Imported Packages compatibility matrix here. Creo Product Insight no longer supports the Internet Explorer browser from Creo 7.0.5. To use Chromium as the embedded browser, set the windows_browser_type configuration option to chromium_browser. The procedure below assumes that you have ThingWorx installed.
a. Click  next to your Creo Parametric release.
next to your Creo Parametric release.b. Click next to Creo Product Insight ThinkWorx Extension.
next to Creo Product Insight ThinkWorx Extension.c. Click to Most Recent Datacode. Next to Download now, click HTTPS. A zip file downloads to your computer.
to Most Recent Datacode. Next to Download now, click HTTPS. A zip file downloads to your computer.4. Extract the files from the downloaded zip file. Zip files of all versions of Creo Product Insight for ThingWorx Extension and the user guides are included in this folder.
5. In ThingWorx Composer, click Import/Export and then click Import. The Import dialog box opens.
6. Select Extension from the Import Option list.
7. Click Choose File. The Open dialog box opens.
8. Browse to the location of the Creo Product Insight for ThingWorx Extension version you need. Select the zip file and click Open.
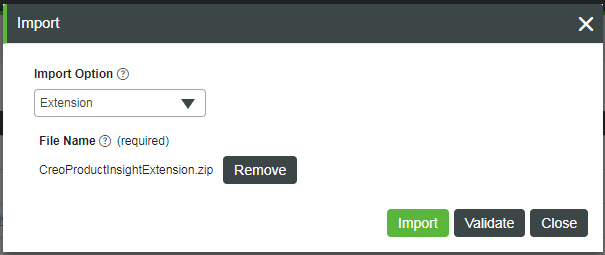
9. Click Import. When the Import Extensions dialog box displays the validation results and the installation results with a green check mark, installation is complete.
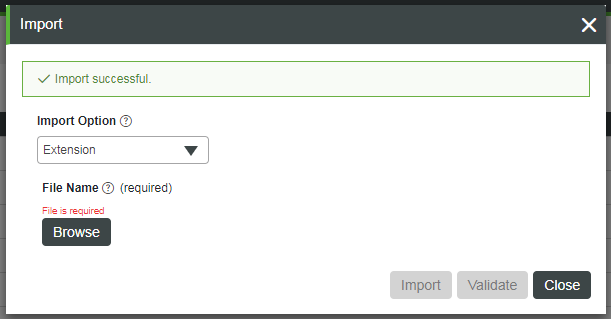
10. Click Close.
11. Refresh the Composer when prompted. In the refreshed composer, you should now see PTC.Creo.HelperThing, PTC.Analysis.CreoConnector, TW.Creo.Thing.ReplayHelper, TW.Creo.Mashup.ReplayEventPickeer, PTC.Creo.ReplayManager, and PTC.Creo.
12. To verify the installation of the extension, click > . The Installed Extension Packages page opens. Look for CreoProductInsightThingworx extension.
13. Select Creo Product Insight for ThingWorx Extension. Details of what is installed with the extension appears in the Package Details table below the list of installed extensions.
14. Perform Post Installation Configuration for Analytics Manager following instructions in the ThingWorx Analytics Help Center.
15. Access ThingWorx Analytics Manager by opening TW.Analytics.ConsoleMainMashup. In the ThingWorx Analytics Help Center, follow the steps in Set a Home Mashup.
In ThingWorx Composer, make sure All is selected, type or paste TW.Analytics.ConsoleMainMashup in the search box and press ENTER. View the mashup. A ThingWorx Analytics tab opens in your browser.
16. Click this tab and click Analytics Manager. ThingWorx Analytics Manager opens.
17. To configure a provider, click New. The New Analysis Provider page opens.
18. Type the name set by the AnalysisProvider property in your config.properties file in the Provider Name box.
19. Select PTC.Analysis.CreoConnector from the Connector list.
20. Click Save.
Publishing Sensor Information to ThingWorx
1. In your design in Creo Parametric, click  Sensor Info and Setup or > Sensor Info and Setup. The Sensor Info and Setup dialog box opens.
Sensor Info and Setup or > Sensor Info and Setup. The Sensor Info and Setup dialog box opens.2. Select the Include check box to include the sensors to publish to ThingWorx.
3. Click > and then OK in the confirmation dialog box.
A publishing operation can take some time. |
4. In the Analytics Manager, create an Analysis Event using the model created.
5. Map the input parameters in the Analysis Event.
Connecting to the ThingWorx Server
1. Click >  Connect to Server in an Instrumented Assembly, or > . The Enter Credentials dialog box opens.
Connect to Server in an Instrumented Assembly, or > . The Enter Credentials dialog box opens.2. Enter your credentials and click OK. The ThingWorxSelect Replay Data from ThingWorx Server page opens.
3. To change the default source of replay data, select a source from the Data Source list.
4. Select start and end dates and time from the Replay Duration boxes. Click Done.
5. To send the data to Creo Parametric, click Send to Creo. In the message area, appears. When the data transfer completes, a  appears in the message area and a Notifications message appears.
appears. When the data transfer completes, a appears in the message area and a Notifications message appears.