Configuring Creo As a Service (CaaS)
Before you begin, configure ThingWorx and configure at least one farm machine running Creo Parametric.
Configuring ThingWorx
You need to set 2 configuration parameters of ThingWorxWSCommunicationsSubsystem Subsystem to set the maximum timeout for server calls.
• Idle Connection Timeout (sec)
• Amount of time a request waits for the response message before timing out (sec)
Base the values on the time needed to load a model from Windchill or for completing the execution of a single analysis slice. The recommended value for simple modes is 200 sec. Both parameter values must be the same.
Configuring a Farm Computer for a Creo Analysis Agent
Use the procedure below to configure a local version of Creo Parametric to use as a Creo Analysis Agent for ThingWorx Analysis.
1. In the Common Files folder of the Creo Parametric Installation directory, find the CreoAnalysisAgentFarmMachineConfiguration.bat file. For example, you may find it here:
c\ProgramFiles\PTC\Creo6.0.0.0\Common Files\text\java\scripts
2. Right click CreoAnalysisAgentFarmMachineConfiguration.bat and select Run as Administrator.
3. Provide a valid Windows username and password at the prompts.
The CreoAnalysisAgentFarmMachineConfiguration.bat file executes the following tasks:
◦ Updates the serviceconfig.properties and proe_start.bat files based on the current Creo Parametric configuration.
◦ Creates a task in the Task Scheduler which runs the Analysis agent Java process on every computer startup.
4. Modify the serviceconfig.properties file to accomplish the following tasks:
◦ Point to the correct ThingWorx Server (URI)
◦ Provide valid ThingWorx credentials (Userid/Password)
◦ Set AgentWorkDir and CreoWorkingDir to valid locations on the local disc
◦ Update ConnectorName and AnalysisProvider based on the configuration made on the ThingWorx Server
◦ For Windchill interaction, update WindchillDefaultContext and WindchillDefaultWorkspace to point the context and workspace that you access. You must have access to the context, product, or project and the checked-in CAD data.
5. To enable logging, update the line D:/ThingworxConnectorEdgeClient.log in the logback.xml file to point to a valid path on your computer.
6. To perform an analysis, make sure the ThingWorx Server is started and run the CreoAnalysisAgentStarter.bat file or restart the computer to start the Analysis Agent Process.
|
|
• Before you start the Analysis Agent process, make sure that the URI in the serviceconfig.properties file is pointing to the running server.
• The system uses redundant Analysis Agents. This means two analysis processes are started simultaneously when you run CreoAnalysisAgentStarter.bat. This ensures that at least one agent process is running on the computer at any given time. You can configure this by changing the UseRedundantAgent property.
|
7. To shut down the process, run the CreoAnalysisAgentShutdown.bat file.
Starting an Analysis
Follow the steps below to start the analysis.
1. Connect to a ThingWorx Server pointed to by the URI.
2. Navigate to the Analysis Replay tab on the TW.Creo.Mashup.ReplayManager mashup.
3. Select the Replay Event, Replay Duration, Replay Mode, and so on and click Start Replay.
4. Enter your Windchill credentials, model-url while starting replay. When you enter the wrong credentials or model-url, you must wait 5 minutes before you can enter new information.
Creo as a Service for Slice-by-Slice Models
The workflow for using CaaS for slice-by-slice models follows:
1. When you have an existing replay, delete it.
2. Connect to the ThingWorx server in a browser and open TW.Analytics.ConsoleMainMashup mashup.
3. Select the Creo Replay Analysis Manager title in the mashup. The Creo Replay Analysis Manager mashup opens.
You can open the TW.Creo.Mashup.ReplayManager mashup directly from the ThingWorx Composer.
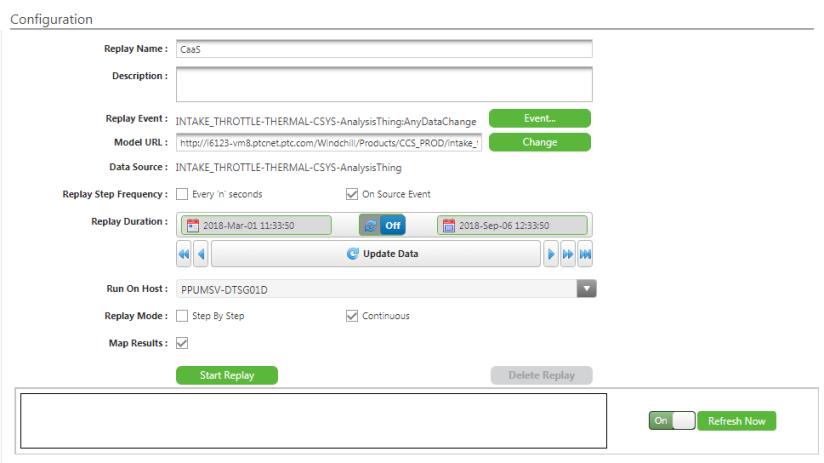
4. Provide a name and description for the new replay.
5. Click Event. The Select Analysis Event for Replay window opens.
6. Select an event from the list and click Select Event.
7. To change the Model URL, click Change. The Creo Model URL dialog box opens.
8. Type a new URL in the box and click Change.
9. To set the Replay Step Frequency, click one of the following options.
◦ Every ‘n’ Seconds
◦ On Source Event
10. Make a selection from the Run On Host list. Only agents started for CaaS are listed. Selecting Any is not recommended. Selecting Any may result in an attempt to deploy the model to a host that was started for interactive analysis from Creo.
11. To upload analysis results back to the source thing, select the Map Results check box.
12. To set the Replay Mode, click one of the following options.
◦ Step By Step
◦ Continuous
13. Click Start Replay.
14. Enter your Windchill credentials, or model-url when starting replay. When you enter the wrong credentials or model-url, you must wait 5 minutes before you can enter new information.