To Add a Harness Part to a Family Table
1. Click
Tools >
 Family Table
. The
Family Table dialog box opens.
2. Click

to add instances to the Family Table.
3. Click

to add a table column. The
Family Items, Generic dialog box opens.
4. Click Reference model from the Add item options. The REFERENCES menu appears with a list of available reference models.
5. Select a reference cabling assembly from the list and click Done.
6. Click OK in the Family Items, Generic dialog box.
7. Type the name of the assembly Family Table instance in the reference assembly cell. Repeat for all instances of the harness Family Table.
8. Click

. The
Family Tree dialog box opens.
9. Click VERIFY.
10. Click CLOSE.
11. If you do not want to add more reference models to the family table, click OK in the Family Table dialog box.
12. Click
 Close
Close on the
Cabling tab to exit the Cabling mode.
13. Click
Tools >
Family Table. The
Family Table dialog box opens. The cabling assembly Family Table displays.
14. Click
to add a column. The
Family Items, Generic dialog box opens.
15. Select Component from the Add Item list. You are prompted to select a component in the assembly.
16. Select the harness part and click OK.
17. In the Family Table dialog box, click Tools > Replace Using > Family Member. The Family Tree dialog box opens.
18. Select the harness Family Table instance to use and click OK.
19. Select additional instances for additional assembly Family Table instances.
20. When you have completed adding the required instances, click
. The
Family Tree dialog box opens.
21. Click VERIFY.
22. Click CLOSE.
23. Click OK in the Family Table dialog box.
Example
Refer the cabling_assembly.asm to learn more about adding a harness part to a family table. Sample models are available at <Creo load point>\Common Files\help\sample_models\cabling. Set FAMILY as the working harness.
1. Click
Tools >
Family Table. The
Family Table dialog box opens.
2. Click
twice to add two instances to the Family Table.
3. Click
to add a table column. The
Family Items, Generic dialog box opens.
4. Click Reference model from the Add item options. The REFERENCES menu appears with a list of available reference models.
5. Select CABLING_ASSEMBLY as the reference cabling assembly from the list, and click Done.
6. In the Family Items, Generic dialog box, under Add item, click Feature. The SELECT FEAT menu appears.
7. In the Model Tree, expand FAMILY.PRT and select CABLE_2. Click Done in the SELECT FEAT menu.
8. Click OK in the Family Items, Generic dialog box.
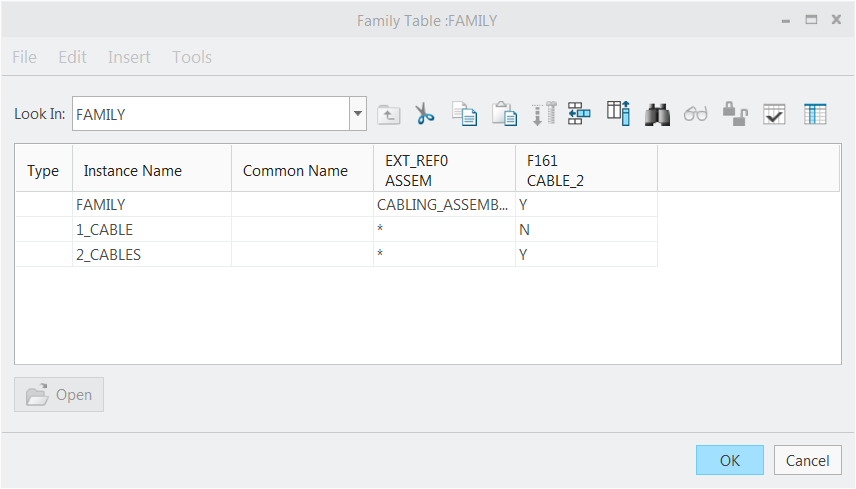
9. Rename the instances to 1_CABLE and 2_CABLES.
10. Set 1_CABLE to N and 2_CABLES to Y as shown in the figure.
11. Click
. The
Family Tree dialog box opens.
12. Click VERIFY and click CLOSE.
13. Click OK. The FAMILY.PRT harness part is added to the Family Table.
14. Click
Close on the
Cabling tab to exit the Cabling mode.
15. Click
Tools >
Family Table. The
Family Table dialog box opens. The cabling assembly Family Table displays.
16. Click
to add a column. The
Family Items, Generic dialog box opens.
17. Select Component from the Add Item list. You are prompted to select a component in the assembly.
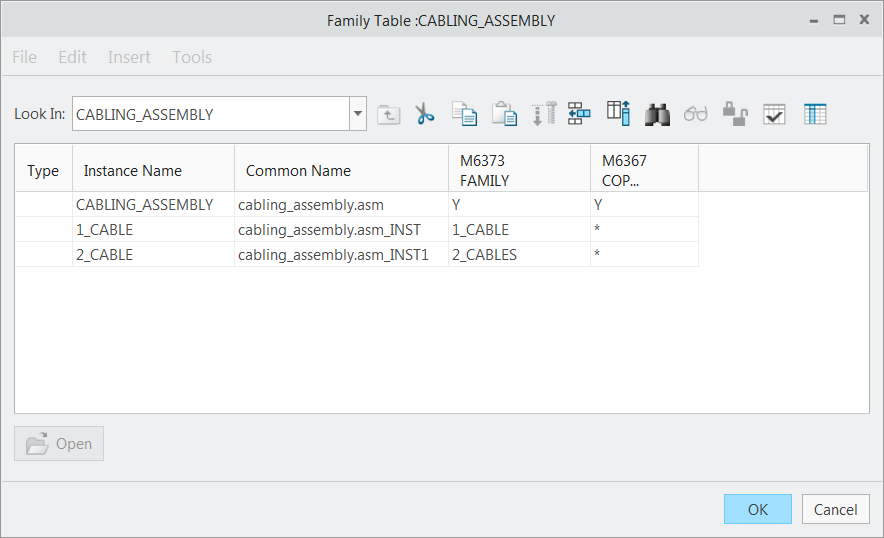
18. Select the FAMILY.PRT and click OK
19. Click
twice to add two instances to the Family Table.
20. Rename instances to 1_CABLE and 2_CABLE.
21. In the Family Table dialog box, click Tools > Replace Using > Family Member. The Family Tree dialog box opens.
22. For the instance 1_CABLE, select the cell under column M6373 FAMILY and click Tools > Replace Using > Family Member. The Family Tree dialog box opens. Select 1_CABLE an click OK.
23. Perform step 7 and 8 for instance 2_CABLE and select 2_CABLES from the Family Tree dialog box.
24. When you have completed adding the required instances, click
. The
Family Tree dialog box opens.
25. Click VERIFY and click CLOSE.
26. Click OK in the Family Table dialog box.
27. Open assembly_environment.asm.
28. From the Model Tree, select CABLING_ASSEMBLY.
29. Click Operations > Replace. The Replace dialog box opens.
30. Click

. The
Family Tree dialog box opens.
31. Select 1_CABLE and click OK in the Family Tree dialog.
32. Click OK in the Replace] dialog box.
The assembly is regenerated and the harness is updated to show only one cable.