To Define a Rotational Pattern of Shapes
You can define a rotational pattern of one or more shapes as follows:
1. Create or import shapes.
2. Select one or more shapes from the Freestyle Tree or in the graphics window.
3. Click > .
4. Select a datum axis as the center of the rotational pattern.
5. In the Number of members box, specify the number of pattern members.
6. Do one of the following:
◦ Specify the angular extent of the pattern as follows:
1. Click Angular Extent if it is not enabled.
2. Specify the angle in the box below.
◦ Specify the angle between adjacent pattern members as follows:
1. Click Angular Extent to disable it.
2. Specify the angle in the Angle between members box. Alternatively, use the dragger to change the angle in the graphics window.
7. Click  OK.
OK.
 OK.
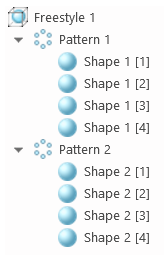
OK.When you define a rotational pattern of shapes, standalone patterns related to each shape are created in the Freestyle Tree. These patterns are independent of each other, and you can edit them separately. |

After defining a rotational pattern of shapes, when you perform geometrical operations, such as Connect, Extrude, and Face Split on the original shapes, the patterned shapes also change accordingly. Connecting the original shapes from two different patterns is possible only when both patterns have same attributes, such as the axis of rotation, number of members, and angle between members. |
You can perform the Connect Pattern and Join Pattern operations to connect or join the pattern members to produce a single symmetrical shape. |
To Delete a Pattern
You can delete an existing rotational pattern as follows:
1. In the Freestyle Tree, select the rotational pattern.
2. Do one of the following:
◦ Right-click and select  Delete Pattern.
 Delete Pattern.
◦ Click > > .
The members of the pattern are deleted, keeping the original shape.
To Edit a Pattern
You can edit the definition of an existing rotational pattern as follows:
1. In the Freestyle Tree, select the rotational pattern.
2. On the mini toolbar, click  Edit Definition.
 Edit Definition.
3. Edit the pattern definition and click  OK.
OK.
 OK.
OK. Rotational Pattern