Common Alternate Workflows
Change a Datum Reference of a DRF
After partially completing a model, it may be necessary to change one or more of the referenced datum features of a datum reference frame.
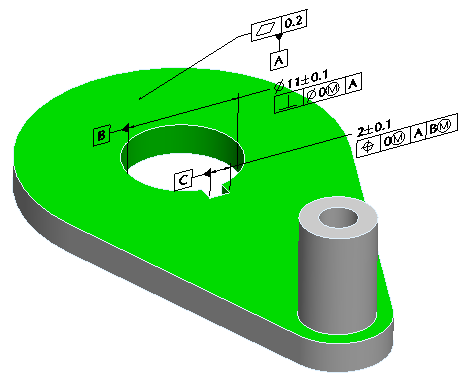
For example, in the model pictured above datum feature C is a slot feature. After partially completing the model you may want to reference the shaft feature as datum feature C. To do so, you should follow these steps:
1. Add the shaft feature and set it as a datum feature. It is automatically given the next available datum label value (e.g., 'D').
2. Reorder the shaft before datum feature C, the slot feature.
3. Edit the A|B|C DRF and select 'D' as the tertiary datum feature. All geometric tolerances that reference DRF are automatically updated.
4. Right-click on Planar Datum C and select Delete from the context menu.
5. Right-click on Axial Datum D and select Change Label from the context menu. Enter ‘C’ for the label and then click OK.
Define Self-Referential Datum Features
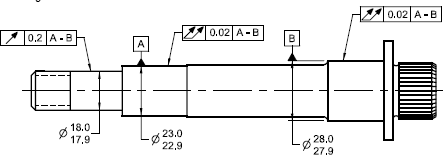
The figure below (from ASME Y14.5-2009) is an example of self-referential datum features. That is, datum features A and B are constrained by circular runout to datum A-B. Thus, this condition calls for a special work flow. Note that due to the fact that these features are self-referential, this case is only supported for a primary datum in GD&T Advisor.
To add a self-referential primary datum, you should follow the procedure below:
1. Add Feature and select two coaxial cylinders or two parallel planes, forming one of the following feature types:
◦ Cylindrical Group
◦ Cocylindrical Group
◦ Planar Group
◦ Coplanar Group
2. Specify the desired controls in the dashboard and then Accept.
3. A window is displayed that asks if you want a separate datum feature for each sub-feature. Click Yes.
4. The Add DRF window is displayed. Select the desired DF Material Boundary for each datum feature, and then click OK.
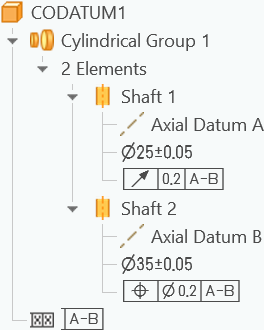
5. The feature is added to the model. The feature includes two subfeatures that are indicated as datum features A and B. DRF A-B is also added to the model.
6. Edit the first sub-feature and apply the applicable geometric tolerance, referencing the common datum, and then Accept.
7. Edit the second sub-feature and apply the applicable geometric tolerance, referencing the common datum, and then Accept.
After successfully completing the process, the Feature Tree will look like similar to the picture below.