Run Draping Simulation
Run Draping Simulation on All Plies
1. On the Laminate Tree, select  Draping Manager.
Draping Manager.2. Select multiple laminate objects as follows:
a. Select PLY_1.
b. Press Shift and select PLY_6_1. All laminate objects are selected.
3. Click  Draping Simulation. The Draping Simulation tab opens.
Draping Simulation. The Draping Simulation tab opens.4. Click  OK.
OK.
OK.Drape status is updated, as shown in the following graphic:
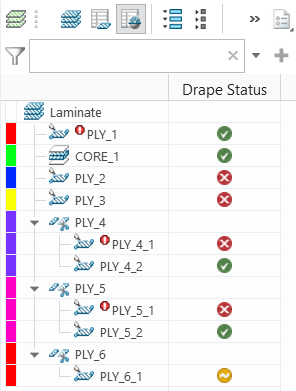
The icon  in front of a ply indicates that the ply is wider than the specified roll width and requires splicing. For this, you need the Composite Design and Manufacturing – Advanced license. in front of a ply indicates that the ply is wider than the specified roll width and requires splicing. For this, you need the Composite Design and Manufacturing – Advanced license. |
5. Select any draped ply and click  Show Draping Results on the mini toolbar. In the Scale to box, make sure that Warn/Limit Angle is selected.
Show Draping Results on the mini toolbar. In the Scale to box, make sure that Warn/Limit Angle is selected.To see the draping results of any draped ply, select the ply. |
See the Effect of Underlying Plies on the Draping Results
1. Select PLY_6_1 and click Draping Simulation. The Draping Simulation tab opens.
Draping Simulation. The Draping Simulation tab opens.2. On the graphics toolbar, click Saved Orientations and select TUTORIAL_ORIENTATION_5.
3. Clear the Drape over underlying plies check box and see the results in the graphics window.
To clearly see the results in the graphics window, move the Sets panel aside. |

4. Select the Drape over underlying plies check box and see the results in the graphics window.

5. Click OK.
OK.6. On the graphics toolbar, click Saved Orientations and select Default Orientation.
7. On the Laminate Tree, click  Laminate List.
Laminate List.