To Create a Closed Loop Curve
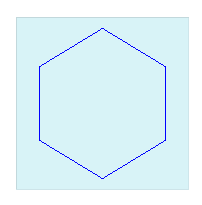
The model used as an example contains six curves that lie in a surface.
1. Click > > >  Closed Loop Curve. The Curve Closed Loop tab opens.
Closed Loop Curve. The Curve Closed Loop tab opens.2. To define the domain on which the curve will lie, make sure the Placement collector is active, and select a surface, a datum plane, a quilt, or a body on which to place the curve.
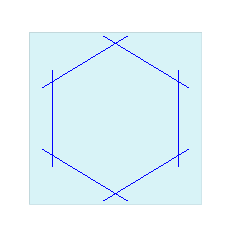
3. To collect the references to form the closed loop curve boundaries, click the Boundary chains collector, and select curves or edge chains. You can click Details to open the Chains dialog to help you select chains. All the segments of the curve must lie on the selected domain.
Creo automatically tries to identify a loop that can be created from the selected chains. The loop is highlighted.
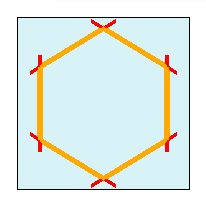
The tool automatically trims excess segments of the chains that are not part of the loop. The excess segments remain in the model, but they are not part of the closed loop curve.
4. If multiple closed loop curves can be created from the selected curves and edges, and the loop does not contain all the chains you want, perform one of the following actions:
◦ Click  Previous Solution or
  Next Solution to cycle through one possible loop at a time, until the loop curve that you want is selected.
Previous Solution or Next Solution to cycle through one possible loop at a time, until the loop curve that you want is selected.◦ Point your mouse over the chains you want until Alternative loop solution appears, and then click the chains.
5. Click  OK.
OK.
OK.When the original reference curves are hidden, you can see that the Closed Loop Curve tool trimmed the segments that are not part of the loop.