To Measure the Angle between Adjacent Manikin Segments
Measure the angle between adjacent manikin segments on a single manikin.
1. Click >  Measure Angle. The Measure: Manikin Segment Angle dialog box opens.
Measure Angle. The Measure: Manikin Segment Angle dialog box opens.2. Select the first manikin segment. It appears in the list under Reference.
3. Hold down the CTRL key and select a segment that is adjacent to the first segment on the same manikin.
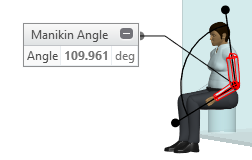
◦ For manikin segments that lie proximal or distal to each other, the angle between the proximal segment and the distal segment is measured. For example, measure the angle between the upper arm and the lower arm:
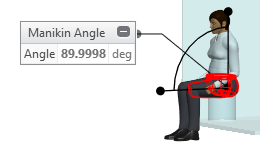
◦ For the clavicle, sacrum, and palm, the angle between the y-axes of the coordinate systems of the two selected manikin segments is measured. For example, measure the angle between the sacrum and the thigh:
The angle value is shown under Results in the Measure: Manikin Segment Angle dialog box, and in the Manikin Angle panel in the graphics window.
4. To save the measurement in the Manikin Angle panel in the graphics window, click  Save > , and click OK. If the saved measurement is visible in the graphics window, it will be updated when the segment is dragged.
Save > , and click OK. If the saved measurement is visible in the graphics window, it will be updated when the segment is dragged.You can collapse the panel by clicking  , or expand it by clicking
  .
.
, or expand it by clicking .5. To save the measurement and references in the Model Tree as a  feature, click Save > , and click OK.
feature, click Save > , and click OK.6. To open the Options dialog box, click  .
.
.7. To display the measurement results in the INFORMATION WINDOW, click  .
.
.8. Click Close.