Create a simplified model
The following graphic shows a part that has been simplified. Notice that although ribs, slots, and holes have been removed, the overall shape has been maintained.
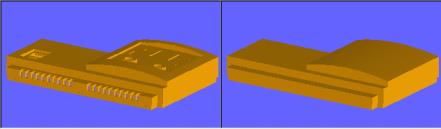
To create a simplified part,
1. Create the simplification definition.
2. Load a part.
3. Click Simplification and then, in the Feature group, click  New. The Create dialog box opens.
New. The Create dialog box opens.4. Create a simplification definition.
5. In the Manage group, click  Execute. The Execute dialog box opens.
Execute. The Execute dialog box opens.6. If necessary, specify the simplification definition you created earlier.
7. Click  in the Execute dialog box.
in the Execute dialog box.To create a simplified assembly,
1. Load an assembly.
2. Click Simplification and then, in the Feature group, click New. The Create dialog box opens.
New. The Create dialog box opens.3. Specify an owner of the definition in the Owner box.
4. If necessary, enter a name for the simplification definition in the FeatName box.
5. Click to complete the definition and close the Create dialog box.
to complete the definition and close the Create dialog box.6. In the Manage group, click Execute. The Execute dialog box opens.
Execute. The Execute dialog box opens.7. Click the Part Simplification check box to simplify the parts of the assembly.
8. In the Structure box, select the appropriate structure.
9. Click in the Execute dialog box to start the simplification process. The Question dialog box appears if a model loaded from Creo Elements/Direct Model Manager has not been saved.
in the Execute dialog box to start the simplification process. The Question dialog box appears if a model loaded from Creo Elements/Direct Model Manager has not been saved.10. Click Yes to execute the simplification process or click No to stop the simplification process and save the model.
 | • The system periodically refreshes the viewport. This is accepted behavior. • You cannot execute a simplification process if the model structure to be simplified has multiple versions of a part or an assembly. • You must save a new model before executing a simplification as it is not possible after executing the simplification. |