Generate an analysis report
Once you have completed your analysis study, you can generate a report of the study. This is referred to as the Study Report. In addition to the standard data, VRML files can also be generated.
FE Analysis's Report button in the Output group lets you directly publish data from the database to a HTML-based file which can be viewed on a web browser.
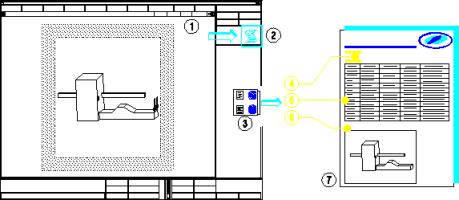
1. Creo Elements/Direct Finite Element Analysis
2. Output group and Report
dialog box.
3. Part and related documents in Creo Elements/Direct Finite Element Analysis
4. Part name and part number
5. VRML file of the result
You must install an external vrml viewer to display VRML files in your report. |
6. Study details such as material, physical characteristics.
7. The generated HTML-based report.
The report contents
The study report provides a complete summary of your study. If it is an assembly-level study, individual part details are also provided. The study report includes such information as:
• General Information
• Mesh
• Material
• LBCs
• Result Tables
• VRML Images
• References
• User Comments
You can specify what information the report is to contain using the Report dialog box. In addition, the following settings for creating a study report are available (see da_config), and can be entered on the user input line or specified in your da_config file:
(ferrum::ferrum-docu-docu-dir "/var/tmp")
(ferrum::ferrum-set-rootdir "personality")
(ferrum::ferrum-docu-logo "personality/DesignAdvisor/CoCreate.gif")
(ferrum::ferrum-docu-project "") ;; e.g. use "<some directory>/project_description.html"
(ferrum::ferrum-docu-author "<your name fetched from the systme>")
(ferrum::ferrum-docu-frame-version 0)
0 ... do not use frames
1 ... use frames
The string docu-dir specifies where you usually want your study reports to be located. Each time you create a study report a new directory is created (or reused). This directory contains several files related to your report such as:
File Name | Description |
|---|---|
document.html | The main report HTML file. |
partname_studyname.html | The browser frame. |
left.html | The left frame. |
top.html | The top frame. |
logo.gif | The logo used in your report. |
studyname_mesh.wrl | The VRML file of the mesh. |
studyname_res.wrl | The VRML file of the results. |
Specifying the contents of a study report
Use the Report dialog box to specify what information the report should contain.
The commands and options available in the Report dialog box are:
Study | The name of the study. |
Part/Assy | The name of the owning part or assembly. |
Directory | The directory where the report and all generated files are saved. |
Document | The name of the report. |
The following commands and options are available when you click General:
Author | Report author's name. Click the check box off for no author name. |
Logo | Your company's logo. Click the check box off for no logo. |
Project | Link to a project. Click the check box off for no project link. |
Specifying study data options
When you click Study Data, you can specify whether or not to include the following information in the study report (check box clicked means include, check box cleared means do not include):
• Mesh
• Material
• LBC
Specifying report results
When you click Results, you can specify the type of analysis results you want to include in the report. Click the check boxes as appropriate depending on the required results.
Specifying the VRML output
When you click Images, you can specify the image name and the type of image format. Click the check boxes as appropriate depending on the required image.
Result | Generates a VRML file of the result. Click the check box off for no image. |
Mesh | Generates a VRML file of the mesh. |