1. Click File > Settings > View 2D > View Settings. The Default Settings browser opens with View settings.
2. Under any of the View settings such as Standard or Section, expand Appearance > View Label. you can then set the following options:
• Label Prefix
You can set the default prefix text before the name of the view. You can enter any text for the prefix.
• Label Case
You can set how and whether the view name is displayed:
◦ As Is
◦ Upper Case
◦ Lower Case
◦ None (only the number appears)
Example: full view name (as in the browser) is “Front 1”
◦ As Is -> "Front 1"
◦ Upper Case -> "FRONT 1"
◦ Lower Case -> "front 1"
◦ None -> "1"
• Label Numbering
◦ Numbers only
◦ Blank or Numbers
◦ Letters only
◦ Letter and Numbers
• Label Characters
Creo Elements/Direct Annotation uses letters and/or numbers in alphabetical/numeral order when labeling views. The first view is named A, and the label next to the view is A; the next view is named B.When the list of Label Characters is exhausted, Creo Elements/Direct Annotation uses numbers.
You can define a specific list of ordered characters.
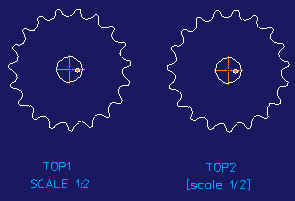
• Label includes Scale
This setting determines whether or not the scale of a view is included in the view label.
◦ Automatic includes the standard and general view scale in the label only when it is not equal to the default scale factor of the sheet on which it lies.
◦ Yes includes the view scale in the label.
◦ No does not include the view scale in the label.
Example:
The illustration shows the scale included the labels of both views; in the view to the left, the prefix is "scale," in upper case, the format is Colon syntax 1:1 with no brackets. In the view to the right, the prefix remains "scale," in lower case, the format is Slash syntax 1/1 with square brackets.