Adding new sheets to sheet metal parts is one way to complete a design. You must first position a workplane and create the 2D geometry which defines the exact contours of the new sheet. Then you use one of the Add by commands to attach the new sheet.
Which of the Add by commands you use depends on the 2D geometry you start with. You can add sheets by using a polyline, which is a string of connected lines, or you use a closed outline. The closed outline must be a valid Creo Elements/Direct Modeling profile.
Creo Elements/Direct Sheet Metal automatically adds the specified bends and the necessary bend reliefs.
The new sheet must be at an angle to the base sheet. You cannot add a sheet at 0 degrees. To enlarge a sheet use the Creo Elements/Direct Modeling commands Extrude or Move Faces.
Add a sheet by its outline
You can use any outline shape, as long as it is a valid 2D profile, to add a sheet to an existing sheet metal part.
Other requirements are:
• One edge of the additional sheet must coincide with an edge of the existing part. Set your Catch mode to Default 3D to ensure a correct catching.
• There must be enough space for the required bend reliefs.
• There must be material to remove the reliefs from.
You cannot add a sheet along the whole length of edge `1' if the side faces of either the existing or the new sheet shrink. The sheets may grow from the common edge, however, and therefore clicking Reverse Dir to reverse the direction of the added sheet may work. To avoid this situation in general, the existing or the added sheet should have rectangular corners. See the graphic below.
Two solutions in this case are to move the outline of the new sheet away from the vertex, or to machine a small rectangular corner before you add the sheet.
Adjacent faces may not shrink
The direction in which the sheet is extruded can be toggled with the button Reverse Dir.
Example: Adding a sheet by its outline
To add a sheet, using its outline, to an existing sheet metal part:
1. Make sure your catch mode is set to Default 3D.
2. To position the workplane:
a. Click Structure and then, in the Workplane group, click the arrow next to Position.
b. Click On Face.
c. Specify the side face (1) of the sheet metal part. See the graphic below.
d. Click .
3. To create the 2D outline:
a. Click Modeling and then, in the Draw group, click the arrow next to Rectangle.
b. Click Rectangle.
c. Click the upper vertex of the sheet, as shown in the graphic below. Make sure that the appropriate 3D Project settings are active. See the 2D CoPilot Settings dialog box.
d. Click another point on the workplane to complete the rectangle.
4. To add the sheet:
a. Click Sheet Metal and then, in the Model Sheet group, click the arrow next to Add by.
b. Click Outline. The Add by Outline dialog box opens.
c. Specify a bend process or accept the default. Default is the bend process set in the Shop Based Settings dialog box.
d. Specify a bend radius or accept the default. Default is the bend radius set in the Shop Based Settings dialog box.
e. Specify a bend relief or accept the default. Default is the bend relief set in the Shop Based Settings dialog box.
f. Click .
The new sheet is attached to the part with the specified bend radius and bend relief.
Add a sheet by a polyline
Adding a sheet by a polyline means to attach a new sheet to an existing sheet metal part.
To add the sheet by polyline you first position a workplane. You then draw a 2D line consisting of one or several straight elements -- a polyline -- which at one end is "connected" to an edge or vertex.
The requirements are:
• One edge of the additional sheet must coincide with an edge of the existing part. Set your Catch mode to Default 3D to ensure a correct catching.
• There must be enough space for the required bend reliefs.
• There must be material to remove the reliefs from.
If you add a sheet over the whole length of an edge, the existing sheet must either have rectangular corners or be able to "grow" from the common edge. You cannot add a sheet if the existing sheet must "shrink" into itself. Clicking Reverse Dir to reverse the direction of the added sheet may work. To avoid this situation in general, the existing or the added sheet should have rectangular corners.
Two solutions in this case are to move the polyline of the new sheet away from the vertex, or to machine a small rectangular corner before you add the sheet.
You specify the sheet length either by entering a value or by measuring an edge of the existing part.
Pay attention to the extrusion direction. The command may fail if you try to extrude into the wrong direction. You can toggle the extrusion direction with the Reverse Dir button.
Example: Adding a sheet by polyline
To add a sheet, using a polyline, to an existing sheet metal part:
1. Make sure your catch mode is set to Default 3D.
2. To position the workplane:
a. Click Structure and then, in the Workplane group, click the arrow next to Position.
b. Click On Face.
c. Specify the side face of the sheet metal part. See the graphic below.
d. Click .
3. To create the polyline:
a. Click Modeling and then, in the Draw group, click Line/Arc.
b. Click point 1, the vertex, as shown in the graphic above. Make sure that the appropriate 3D Project settings are active. See the 2D CoPilot Settings.
dialog box
c. Complete the unclosed contour by selecting the points 2 to 4. (This example gives no dimensions, but the first line must start at an angle of 1 degree or larger.)
4. To add the sheet:
a. Click Sheet Metal and then, in the Model Sheet group, click the arrow next to Add by.
b. Click Polyline. The Add by Polyline dialog box opens.
c. Specify a bend process or accept the default. Default is the bend process set in the Shop Based Settings dialog box.
d. Specify a bend radius or accept the default. Default is the bend radius set in the Shop Based Settings dialog box.
e. Specify a bend relief or accept the default. Default is the bend relief set in the Shop Based Settings dialog box.
f. Click point 5 to specify the material side.
g. To specify the sheet length, enter the extrusion distance (for example 70) next to Length.
h. Click .
The new sheet is attached to the sheet metal part with the specified bend radius and bend relief.
 Add by commands to attach the new sheet.
 Position
 On Face
 .
. Rectangle
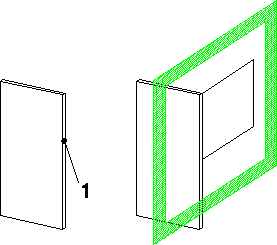

 Line/Arc
 Polyline