An existing lip can be extended, or stretched, on the sheet metal part. You have considerable control over the faces and features that can be moved in a stretch operation. A lip is stretched in the direction normal to the plane of the lip-start in the direction of the bend area:
The direction is defined by specifying the bend and the base face.
After you specify the lip to stretch by clicking one of its faces, the system then searches for a bend area. It automatically selects a face on the larger side of the bend area as the base face; however, you can change this base face selection. You then specify a distance for the stretch. This can be a negative value, in which case the lip is "shrunk" in the negative direction.
Adjacent faces and faces belonging to reliefs can optionally be included in a stretch operation. When this option is specified, Creo Elements/Direct Sheet Metal selects the relief faces and the side faces adjacent to the lip, and in addition, those faces whose normals are in the lip direction. While this option is selected, the affected faces are highlighted on the part.
All holes and features (such as punch and stamp features) within the bend area of the lip are detected and moved along with the lip. In other cases, you have the possibility to add and remove individual faces of features from the face list, so that a lip can be stretched with or without specific features.
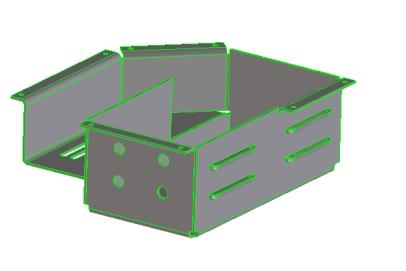
For example, the following graphic shows features that are moved along with the stretched lip, also the adjacent and relief faces, and additionally the extra faces (the vents on the side face) that are moved after being selected separately:
To stretch a lip,
1. Click Sheet Metal and then, in the Modify Sheet group, click the arrow next to Lip.
2. Click Stretch. The Stretch Lip dialog box opens.
3. Click the Lip to stretch. The Base Face is automatically selected by the system.
4. If necessary, specify a different base face for the lip.
5. Enter a distance by which to stretch the lip. You can enter a negative value, in which case the stretch will occur in the opposite direction (the lip will shrink).
6. The On Line and Single check boxes are active if the lip is forked, that is, consists of more than one separate bend:
◦ On Line assigns a single feature to all bends of the lip, so that all parts of the lip are stretched.
◦ Single copies the bend feature to the bend of the selected part of the lip; the other part receives its own independent bend feature. In this case, only the selected part of the lip is stretched.
7. Click the Adjacent & Relief Faces check box to move adjacent faces and relief faces (whose normals are in the lip direction) along with the lip.
8. To include individual faces not already selected in the current face list (for example, faces of a punch or stamp feature), click Shift Faces and click the face to add.
9. To remove individual faces included in the current face list selection, click Rem Faces and click the face to remove.
10. Click Preview to see how the stretch will look according to the current selections.

 Lip.
Lip. Stretch. The Stretch Lip dialog box opens.
 to complete the operation.