Adding a hem means to attach a sheet which is folded by 180 degrees. To add a hem you click an edge to specify where you want to add it. The edge you pick (1) specifies also the hem's folding direction. You also need to specify the length of the hem and the hem distance.
Adding a hem does not change the overall length of a sheet metal part.
Keep the following restriction in mind: The front face of the hem must be a rectangle.
Hem bend
Define the hem bend as follows:
• Specify the angle of the hem with respect to the sheet to which the hem will be added.
• Select the hem process by which the hem is to be produced.
• Specify the hem distance.
Hem shape
Note that the hem outline displayed by Creo Elements/Direct Sheet Metal indicates the shape of the hem to be created. The hem shape is controlled by:
• The hem length. Once you have specified the hem length, the associated hem profile (plus its workplane) is displayed. This hem profile provides instant visual feedback of any changes in hem shape, size, and orientation.
• The hem-profile length, angle, and distance can be defined by entering values directly, with reference to a neighboring face, or by aligning it with the symmetry plane of a corner. The options are:
◦ The angle of the "left" edge of the hem.
◦ The distance between the hem and the "left" vertex of the existing edge.
◦ The angle of the "right" edge of the hem.
◦ The distance between the hem and the "right" vertex of the existing edge.
Note that these two distances define the "width" of the hem and thus the "width" of any offset between the hem and the original sheet.
Restriction: When selecting multiple edges, the operation only works reliably on parts that are symmetrical.
Hem connections
Bend and corner reliefs are necessary to prevent any undesired material distortion during manufacturing. The type and dimensions for bend and corner reliefs are very much design dependent and can be freely chosen.
Example: Adding a Hem
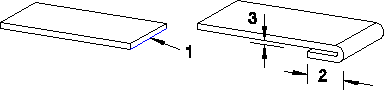
In this example you will add a hem to an existing sheet metal part. Shown below are the existing and the resulting part:
1. Click Sheet Metal and then, in the Model Sheet group, click Hem. The Add Hem dialog box opens.
2. Click the edge (1) where you want to add the hem.
3. Specify a Lip Length (2), for example 10.
4. Specify a bend Process or accept the default. Default is the Hems process.
5. If necessary, click Hem Dist and choose a distance value (3) from the Hems table.
6. Specify any Shape or Connection parameters as required.
7. Click Preview to preview the sheet metal part with the hem.
8. Click .
Creo Elements/Direct Sheet Metal adds the specified hem to the sheet metal part.
If you enter a distance for which there is no allowance value in the TDB, Creo Elements/Direct Sheet Metal prompts you with a warning. Based on the message Creo Elements/Direct Sheet Metal issues, you can decide to continue (click Continue) or enter a new distance (click Cancel).

 Hem. The Add Hem dialog box opens.
 .
.