Creo Elements/Direct Cabling Tutorial 4: Step 3 of 4
Connect wires to points
Now wires connect to the terminals. In this step you will connect the last two black & white wires to the press-in holes on the back of the outlet.
To connect wires to points,
1. Click Cabling and then, in the Modify group, click Move End Pt. The Move Cable End Point dialog box opens.
2. Select the white wire near its end.
3. Select Point in the Destination Point section
4. While holding down the Ctrl+Shift keys and hovering over the cylindrical edge of the press-in feature, click to select the edge. It catches the center of the press-in feature, like this:
The wire moves, but it is not coming out of the press-in feature correctly. You need to change the tangency direction.
5. Click Tang Dir in the dialog box.
6. Hover over the flat face of the back of the plug and a 3D copilot arrow shows the tangency direction.
7. Press the Tab key to reverse the tangency direction and click. Now the wire centers in the press-in feature.
8. Click OK to complete the operation.
9. Repeat these steps to connect the black wire to the other press-in feature.
The white and black wires now connect to points in the assembly.
 Move End Pt. The Move Cable End Point dialog box opens.
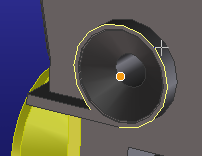

 to complete the operation.