Angle dimensions show the angle between two referenced geometry elements. The two reference elements define a larger and a smaller angle. Creo Elements/Direct Modeling always measures the shorter angle between elements.
With a face (or edge) as reference element, the extension line originates in the vertex nearest to the point you click. This vertex defines the reference position. In the case of non-planar elements Creo Elements/Direct Modeling measures the angle between tangential planes.
You can add an angle dimension to a part, to multiple parts within an assembly, and to profiles.
For free dimensions, Creo Elements/Direct Modeling automatically creates the display plane for the angle dimension at the first reference position parallel to the dimension direction. You can also specify a docuplane that implies a defined measure direction, if it is valid for the dimension. You can reposition a dimension label only within its display plane or docuplane.
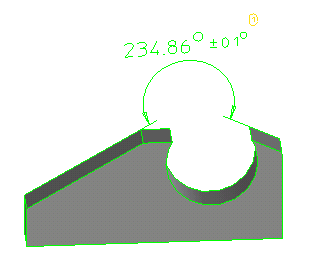
The figure below shows an example of an angle dimension.
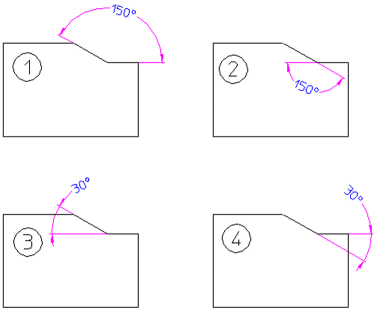
Angle dimensioning provides four orientation options, as shown below:
1. Direct
2. Opposite
3. Adj Plus
4. Adj Minus
You can click Swap (in the Create Angle Dim dialog box) to swap the direction of a dimension. Swap allows you to dimension all eight different angles between the points of reference.
To create an angle dimension,
1. Click 3D Documentation and then, in the Annotate group, click Angular. The Create Angle Dim dialog box opens.
2. If necessary, specify whether you want to create a Generic dimension or GD&T by clicking the appropriate tab.
3. Select the references for the dimension:
◦ Generic: Click two references defining the angle.
◦ GD&T: Select the faces or features to control, and then select the datum.
The selected references are highlighted, the extension lines of the dimension label snap to the selected vertices, and the dimension label becomes attached to the cursor. Note that the dimension value is displayed in the Dim Value box, which updates dynamically as you alter the current dimension.
4. Specify the placement of the dimension:
◦ To create a free dimension, select Free under Orientation/Placement, and click a position for the dimension label. The plane of the dimension is determined by its reference points.
◦ To place the dimension on a docuplane, click Docuplane and specify the docuplane to use (double-click it in the browser, or click it in the viewport). The active docuplane, if present, is selected by default.
After placing the dimension label, you can click it or any other label to move it and click another position. This is allows you to organize labels "on the fly".
5. Click the required orientation for the angle dimension as described above. If you have clicked the angle references in the wrong order, click Swap to take the angle that would arise if the two sides had been clicked in the opposite order.
6. If necessary, you can add tolerancing information to the dimension.
7. You can include a prefix, postfix, subfix, or superfix with the dimension value by expanding the Text fixes area and entering text into the appropriate boxes.
8. You can use predefined tolerances and/or text fixes in two ways:
◦ Presets: Click this to open a table containing values that were stored earlier.
◦ Grab: Click this and then click an existing dimension in the viewport. The tolerance and text fixes of the selected dimension are copied into the menu and used for the current dimension.
9. If you are creating a GD&T dimension, you must also specify a Name for it. Optionally, you can also include a Descr, dimension critical Identifiers, or Insp. Notes. These will be shown in feature reports.
10. You can add a URL to a dimension text, which can be any file on your local computer, network, or the public Internet. The file will open in its default viewer when you right-click the dimension, then click Display URL.
11. You can end the current dimension in one of two ways:
◦ Click Next to complete the current dimension and continue creating new dimensions with the same tolerance and text fixes.
You can avoid clicking Next; once the current dimension is complete, simply click new references on the model to define a new dimension. The system will automatically make this the current dimension using the current settings.
◦ Click Reset to cancel the current dimension but keep the menu open with the same tolerance and text fixes.
12. When you are finished creating dimensions, click to complete the operation.
 Angular. The Create Angle Dim dialog box opens.
 to complete the operation.