The dynamic surface modification functions of Creo Elements/Direct Modeling enable you to change the shape of a surface by manipulating the mesh curves which define that surface. After manipulating a surface, the modified surface is re-aligned with the part from which it originated.
If the surface you wish to modify was originally created using the skin function, the mesh displayed when you select the surface is composed of the original curves used to define the surface. If the surface was generated by other surfacing or freeform operations, or was imported from an external application, you will need to define the surface mesh using the Add Curve or Delete Curve functions.
The figure below shows a surface modification in which a node (1) is moved to a new position by defining the direction and distance of the new point.
Surface modification by direction and distance
The figure below shows a surface modification by changing the normal direction at a node (1).
Surface modification by normal at node
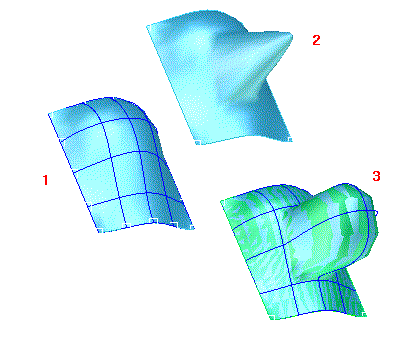
The figure below compares two modifications to a surface 1; first using a low weight factor (2), and then with a high weight factor (3).
Surface modification by weight at node
If the face you want to modify is connected to a neighboring face by a smooth tangential transition along an edge, which is not an isoparametric curve of the surface, it will not be possible to keep the tangency to the neighboring face.
To add or remove a mesh curve,
You can modify mesh curves by changing the position of the nodes at which the mesh curves intersect. When you select a mesh node for dynamic modification, the boundary of the surface area that will be modified is defined by the nodes which are the direct neighbors of the selected node. The closer together are the neighboring nodes, the smaller is the surface area that is modified and, conversely, the more widespread the neighboring nodes, the greater is the surface area that is modified.
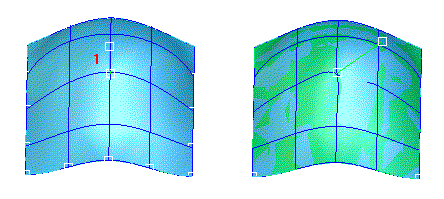
To reduce the area directly affected by a surface modification, add curves to the mesh; to increase the affected area, remove curves from the mesh.
The figure shows an area of a surface mesh (1) defined by a central node surrounded by its eight neighboring nodes. You can see how the area of influence around the central node contracts by adding curves to the mesh (2), or expands by removing curves from the mesh (3).
To modify a surface by normal and distance,
Use this method to move a node in a specified distance up or down the surface normal at the node.
1. Select the node to move. Creo Elements/Direct Modeling displays an arrow showing the direction of the surface normal and dynamic feedback showing the shape of the new surface.
2. Specify the distance using one of the following methods:
◦ Enter the distance in the user input line.
◦ Click a point along the surface normal. Use the multiview mode if necessary.
To modify a surface by direction and distance,
Use this method to move a node a specified distance in a direction defined by the Direction 3D tool.
1. Select the node to move. Creo Elements/Direct Modeling displays the
Direction 3D CoPilot tool.
2. Specify the direction in which to move the node. Creo Elements/Direct Modeling displays an arrow showing the specified direction and dynamic feedback showing the shape of the new surface.
3. Specify the distance using one of the following methods:
◦ Enter the distance in the user input line.
◦ Click a point along the specified direction.
To modify a surface by normal direction,
Use this method to change the direction of the normal at the node. You will probably find it useful to use this function together with the SfNor+Dist function.
1. Select the node to move. Creo Elements/Direct Modeling displays the
Direction 3D CoPilot tool.
2. Specify the new direction of the normal at the node.
To modify a surface by normal weight,
Use this method to modify the region of influence of the surface tangent plane at a node by changing the weighting factor. A high weight factor causes the mesh, and therefore the surface, to be attracted to the tangent plane at the node to a greater degree than for a low weight factor.
1. Select the node to modify. Creo Elements/Direct Modeling displays dynamic feedback showing the shape of the surface under different weighting conditions.
2. Set the new weight at the node using one of the following methods:
◦ Click a point when the desired shape is shown by the feedback curves.
◦ Enter a weighting factor in the range 0.2 to 5 into the user input line. (The weighting factor 5 has the greatest attraction to the surface tangent plane.)
To modify a surface by relative coordinates,
Use this method to modify a surface by specifying relative coordinates in a coordinate system defined by the node as origin, the surface normal at the node as W-axis, and the tangent plane at the node as U- and V-axes. The axes are a useful guide when identifying a point in the multiview mode. Note that when you select a point in one of the orthogonal views of the multiview mode, the modification is restricted to that viewing plane.
1. Select the node to modify. Creo Elements/Direct Modeling displays the UVW axes of the relative coordinate system, with the node as origin. Dynamic feedback is also provided to show the new shape of the surface.
2. Specify the new position of the node using one of the following methods:
◦ Click a point when the desired shape is shown by the feedback curves.
◦ Enter the coordinates of the new node position into the user input line.