If you create a screw connection as a feature, you can modify them in the Creo Elements/Direct Part Library menus. If you did not create a drilled hole, you must change the screw using normal Creo Elements/Direct Modeling commands.
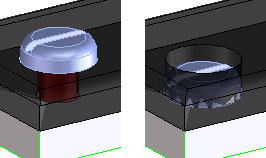
The screw connection on the left was changed from a normal hole to a sink hole, which shown on the right:
To change a screw or pattern of screws,
1. Click Part Library and then, in the Screw conn group, click the arrow next to Modify.
2. Click Screw Length. The Modify Screw dialog box opens.
3. Click Screw and select the screw or pattern in the Structure Browser.
4. Click Part to change the screw to a different part from Creo Elements/Direct Part Library.
5. Click Length + to lengthen the screw to the next available length.
6. Click Length - to shorten the screw to the previous available length.
7. The Length field displays the screw's current length.
8. Click OK to complete the operation.
To reverse the direction of the screw,
1. Click Part Library and then, in the Screw conn group, click the arrow next to Modify.
2. Click Reverse. The Reverse dialog box opens.
3. Click Screw and select the screw or pattern in the Structure Browser.
4. If necessary, the new screw length can be adjusted:
◦ Keep: Don't change the screw length.
◦ Automatic: Automatically scans for the next length available, if necessary.
◦ Part: Allows you to choose a part from the table.
5. Click OK to complete the operation.
To change the screw hole and accessories,
1. Click Part Library and then, in the Screw conn group, click the arrow next to Modify.
2. Click Conn. Parameter. The Modify parameters dialog box opens.
 Modify.
 Screw Length. The Modify Screw dialog box opens.
 to complete the operation.
 Reverse. The Reverse dialog box opens.