The Inspection module allows inspection information in the form of a measurement plan to be attached to the Creo Elements/Direct Modeling model. This measurement plan can then be exported as a comma separated file (CSV file) to allow inspection data to be entered into it. This CSV file can then be re-imported into Creo Elements/Direct Modeling to perform an evaluation on the design model.
The following shows the general process flow of the Inspection module:
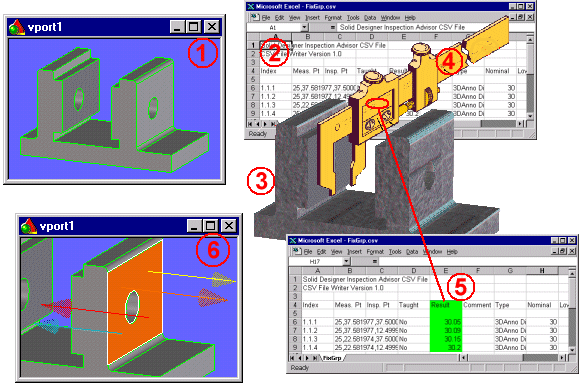
A Simplified Inspection Process
Item
Description
1
The design model as seen in a Creo Elements/Direct Modeling viewport.
2
The exported measurement plan (CSV file).
3
The manufactured model ready for measurement inspection.
4
Measurements are taken using an accurate measuring device and the results are entered into the measurement plan (5).
5
Results from step 4 are entered into the plan that was exported in step 2 (CSV file).
6
The measurement plan is re-imported into Creo Elements/Direct Modeling and applied to the design model. Differences between design model values and manufactured model values are indicated graphically.
The following suggests typical engineering responsibilities in a medium-sized design team. It is only meant as a guide to help clarify the tasks involved. The design engineer is responsible for specifying the tolerances and the design specification using the 3D Documentation module to create 3D annotations. The design engineer retains the master copy of the design model and may continue to refine the design while the measurement plan is being prepared or modified.
The inspection engineer is responsible for the development of the measurement plan to ensure that the product conforms to the measurements specified by the design engineer. This involves grouping the required measurement steps into an efficient sequence and specifying the inspection points on the model being measured. At any instant in time, the inspection engineer may be working on a file copy of the design model that may not be in step with the master design model.
The inspector is primarily responsible for inspecting the manufactured part using the supplied measurement plan and entering results into the CSV file. In addition, the inspector may make modifications to the measurement plan by adjusting the measurement points used for the inspection process. Using a process known as teaching, these adjusted points can be used to update the location of the measurement points within Creo Elements/Direct Modeling.
Preparing the Measurement Plan
• Grouping of Measurements
The measurement plan specifies how the design model should be verified. Since measurement plans can contain a very large number of measurements, it is useful to group them. Grouping measurements makes it easier to track and manage the complex process.
The grouping of annotations (in this context, dimensions) is done within the 3D Documentation module. This module allows a hierarchical grouping of measurement annotations (that is, tree structure with groups as the tree nodes and measurement annotations as the tree leaves). In some designs, the order in which measurements are performed may be important. In others, it may not. The inspection module allows specification of a sequence within the annotations of one group.
A group created for measurement purposes may only contain annotations with a common owner (part or assembly). Groups may be used for different classes of measurement (for example, first inspection or QA), for grouping by measurement method (for example, manual, CMM, or scanning) or for grouping by configuration (for example, fixture, or CMM setup). Finally, a measurement plan is itself a group.
For further information about grouping, refer to
3D Documentation.
• Preparing the Measurement Plan
Measurements are assigned to groups using the standard group manipulation capabilities available in the 3D Documentation module. However, the inspection module also provides a specific measurement preparation capability. This allows you to effectively manage a group of annotations designed primarily for use in a measurement plan.
The inspection engineer is able to define a (optional) coordinate system to be used for each measurement group. This is usually influenced by how a part is located in a CMM machine. Although groups in a hierarchical structure may each have their own coordinate system, a group at any level is not influenced by the coordinate systems of its ancestors.
• Defining Measurement Points
Measurement points must be within the boundaries of the faces associated with the measurement annotation or on other faces with the same owner. If you select a measurement point on a face outside these requirements, you must confirm that you wish to do so. The additional faces will then be included in the specified annotation.
For 3D annotations, points on the source and target faces are in two distinct sets (as discussed previously). For GD&T features, the associated faces are those faces which are controlled by the GD&T tolerance. They may be a single face or a pattern of faces. By default, measurement points are shared whenever possible. This means that if two different dimensions are used to control a face, the measurement points will be shared. However, a set of independent measurement points can also be defined in this situation.
If a GD&T tolerance is to control a pattern of faces and another is used to control an individual face, the measurement points may not be shared since each tolerance has a different scope of impact.
At this point, it is worth remembering that GD&T tolerances have rules which must be adhered to. 3D annotation dimensions however, are simply 3D dimensions which have no real constraints applied to them
For 3D notes, measurement points can be created on the reference face and may reference multiple faces (a set of measurement points for multiple faces cannot be shared by other annotation). Measurement points are not allowed if a 3D note references edges or vertices.
Measurement points can be created by selecting a location on a face, by a face set (by specifying how many equally distributed points you require on a face), or by referencing existing feature points. You can also create precisely located measurement points by selecting a location on a face using catch mechanisms such as the intersection of two construction lines.
It is not possible to define measurement points on edges or vertices because every measurement point must be related to a single face. This is because reliable inspection of a point on an edge (intersection of two faces) or at a vertex (intersection of three faces) is inherently unrepeatable and unpredictable.
Adding Measurement Points
Measurement points can be added to faces and features on the design model. The system automatically creates a grid of points on the face using the specified U/V values.
• Measurement Point Properties
Each measurement point is characterized by the following properties:
◦ Index: An identifier allocated when a point is created but updated whenever its location is modified. Indexes are unique to the element referenced by the measurement point.
◦ 3D Coordinate: The point in the owner's local space at which the point is located.
◦ Taught Flag: (Not normally visible) This indicates whether the point was created/modified by the inspection engineer or has been imported from an external file following teaching. This property cannot be edited. It is information provided by the system to tell you if a measurement point has already passed the teaching process.
◦ Shared: Indicates whether or not the point is shared.
Although the Inspection module dialogs are provided for defining all of the data described above, a graphical browser is also available for inspecting measurement plan data. The browser is an effective way of visualizing hierarchy and sequencing, and also provides shortcuts for initiating some of the operations performed from the dialogs.
Validating the Measurement Plan
Once the measurement plan has been prepared, it should be validated before being exported. Validation verifies that the specified measurement plan still makes sense for the current state of the design model. For example, validation checks that measurement points still lie on the specified face, and annotations referenced in the plan are still meaningful.
A plan is valid if:
• All measurement annotations in the group have the same owner (but may have different docuplanes).
• There are no measurement annotations with unassigned measurement points.
• All measurement points lie on the faces associated with the annotation (which may not be the case if a design change has made a previously defined point invalid). Normally the inspection engineer should not be allowed to make geometrical changes to the design model (the inspection engineer should be working on a copy of the master model).
If validation fails, the system displays the error information in a browser window (this information can also be written to a text file). In this case the inspection engineer needs to update the measurement points to be consistent with the current design before an external file can be generated. Validation results can also be displayed in the measurement graphical browser.
Exporting the Measurement Plan
When preparation of a measurement plan is complete, the measurement plan can be exported to an external file. The external file should only be generated if the plan passes validation.
Basic dimensions are ignored during measurement preparation and when exporting the plan (basic dimensioning does not show up in the CSV file).
The output file will include a set of header rows (one of which will identify the units in which the file was written). The start of the inspection data rows will be identified by a row containing a configurable set of column headings. All inspection data in the file is written relative to the coordinate system associated with the group during measurement preparation. The heading names are known by the Inspection module and must not be changed (additional columns can be added).
The following table presents an example of an external CSV file exported from the Inspection module: