Append segments to flat cable routing
You can append linear, rounded, and twisted, and folded segments to an existing flat cable. You can also bridge two flat cables, connect a flat cable to a connector, or add a segment attaching an existing flat cable to a face on your model.
To append a linear segment to a flat cable,
1. Click
Cabling and then, in the
Flatcable group, click the arrow next to
.
2. Click
. The
Add Cable Segment dialog box opens.
3.
4. Length slider to extend the flat cable.
5. Add another segment or click
to complete the operation.
To append a round segment to a flat cable,
1. Click
Cabling and then, in the
Flatcable group, click the arrow next to
.
2. Click
. The
Add Cable Segment dialog box opens.
3.
4. Radius and Arc Angle sliders.
5. Flip to flip the orientation of the new segment.
6. Add another segment or click
to complete the operation.
To append a twisted segment to a flat cable,
1. Click
Cabling and then, in the
Flatcable group, click the arrow next to
.
2. Click
. The
Add Cable Segment dialog box opens.
3. Length , Twist , Shift First , and Shift Second sliders.
You can twist the cable in the anticlockwise or clockwise directions by specifying a twist between -180 degrees and 180 degrees.
4. Add another segment or click
to complete the operation.
To bridge two flat cables or connect a flat cable to a connector,
1. Click
Cabling and then, in the
Flatcable group, click the arrow next to
.
2. Click
. The
Bridge dialog box opens.
3.
4.
5. TangLen box.
6. Flip to flip the orientation of the new segment.
7. Create Cable .
8. Click
to complete the operation.
To append a segment attaching an existing flat cable to a face on your model,
1. Click
Cabling and then, in the
Flatcable group, click the arrow next to
.
2. Click
. The
Go to Face dialog box opens.
3.
4. TangLen menu.
5.
6.
7. Flip to flip the orientation of the new segment.
8. Create Cable .
9. Click
to complete the operation.
To append a folded segment to a flat cable,
1. Click
Cabling and then, in the
Flatcable group, click the arrow next to
.
2. Click
. The
Fold Flatcable dialog box opens.
3. Bend Angle and specify an angle for the bend.
4. Bend Radius and specify a radius for the bend.
5. Append Face and select a face on the flat cable which you wish to fold.
6. Shift Angle and specify a shift angle for the fold.
7. Flip Dir in the Reverse Bend section to change the fold direction.
8. Flip Side in the Change Bend Side section to change the side of the bend.
9. Click
to complete the operation.
This site works best with JavaScript enabled
 Append.
 to complete the operation.
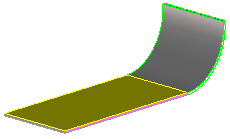
 Round flatcable. The Add Cable Segment dialog box opens.
 Twisted flatcable. The Add Cable Segment dialog box opens.
 Add.
Add.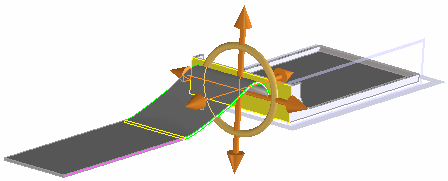
 Flatcable to Face. The Go to Face dialog box opens.
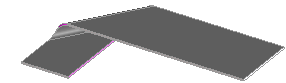
 Fold.
Fold.